Swaggerize your API Documentation
By: Brad
Hey Brad how the heck do I use Swagger to document my Node.js service APIs?

The Swagger tool which generates the documentation is a command line utility which when run will read the OpenApi Specification (OAS) description you created for your APIs and outputs HTML, CSS, and JavaScript. You can then host that generated code anywhere you wish.
One option for using Swagger to generate your API documentation is to define your OAS, maybe check it into your repo as a JSON or YAML file, then manually run the Swagger UI tool. You can then either commit the generated code in a GitHub Page, upload it to a web server or wherever you want to keep your documentation. You could even have your service host it statically.
Have my service host it you say
Why not have the service actually host its own documentation?
For me if my service had a /docs route which when hit served up my Swagger documentation it would make it very easy to locate the API documentation for my service. I don’t have to go to Confluence, GitHub, or any other location I just have to start up the service and hit the /docs route. This would then make the right version of the documentation available no matter which environment I was on.
The other benefit to this is that you can have the service generate the documentation each time it is started up so while developing you can update the documentation, restart the service then see the new documentation imminently reflected in the /docs route. Seeing how Swagger documentation allows you to hit the route you could even use the updated documentation to test the changes you just made in the API.
Ok I’m sold how do you set that up?
To have your Express.js server re-generate and host your Swagger documentation each time it starts up you need two packages:
There are Restify equivalent Swagger packages and with a little work you can use these Express middlewares in Sails projects.
swagger-ui-express is a package which attaches a new route to your Express.js app used to statically host the Swagger documentation. You pass it a JSON or YAML OAS definition and it will generate the documentation each time the application is started up.
To use swagger-ui-express you call its setup() function passing the result into the Express .use() API. When the below is started up I will be able to hit its /docs route and see the Swagger UI documentation.
const oasDefinition = require('./config/swagger.json');
const swaggerOptions = {
  customSiteTitle: 'My Service',
  customCss: '.topbar { display: none }',
};
app.use('/docs', swaggerUi.serve, swaggerUi.setup(oasDefinition, swaggerOptions));
Note above I feed in custom CSS to hide the Swagger branded header bar. The
customSiteTitleoption sets the pages title so that it does not default to ‘Swagger UI’.
You could just use swagger-ui-express by writing up your OAS and store it in its own JSON/YAML file however that would mean that the API documentation and its implementation are stored into different locations. To keep the documentation with the implementation you can use JSDoc comment blocks, although you won’t be using any standard JSDoc annotations so let’s just say JSDoc in spirit comment blocks. This is where swagger-jsdoc comes in.
With swagger-jsdoc you can store the OAS definition as JSDoc comment blocks so that the definition is located with each API implementation. On application start up each *.js file based on a glob will be scanned for the comment blocks then swagger-jsdoc will generate the OAS for you. You then pass the generated OAS into swagger-ui-express‘s setup function just as before.
const swaggerJSDoc = require('swagger-jsdoc');
const options = {
  swaggerDefinition: {
    info: {
      description: 'My cool API',
      version: '1.0.0',
      title: 'My Service',
    },
    host: `localhost:8080`,
    basePath: '/',
    produces: ['application/json'],
    schemes: [
      'https',
    ],
  },
  apis: ['./**/*.controller.js'],
};

const oasDefinition = swaggerJSDoc(options);
const swaggerOptions = {
  customSiteTitle: 'My Service',
  customCss: '.topbar { display: none }',
};
app.use('/docs', swaggerUi.serve, swaggerUi.setup(oasDefinition, swaggerOptions));
The above isn’t really all that different except some of the base OAS is being defined here such as the title, description, base path, etc. Notice the apis property, that is what tells swagger-jsdoc which files to scan for the comment blocks. Because in my example I used the *.controller.js extension for all my controllers and that is where I documented my API I told swagger-jsdoc to just look at those files vs. all my JavaScript files. Being an array you can pass multiple globs into it.
Notice the
hostproperty, this is needed because as its been said the Swagger UI documentation is interactive, readers can post to or fetch from the API. For this to work Swagger needs to know how to hit the API and this is done by thehostproperty. Because the host might be different in different environments due to different reverse proxy setups you might want to consider setting thehostproperty dynamically via environment variables.
Here is an example of a swagger-ui-express & swagger-jsdoc setup.
./config/swagger.js
'use strict';

const swaggerJSDoc = require('swagger-jsdoc');
const nconf = require('nconf');

const { description, version } = require('../../package.json');

const port = nconf.get('app_port');
const host = nconf.get('app_host');

const options = {
  swaggerDefinition: {
    info: {
      description,
      version,
      title: 'My Service',
    },
    host: `${host}:${port}`,
    basePath: '/',
    produces: ['application/json'],
    schemes: [
      'https',
    ],
  },
  apis: ['./**/*.controller.js', './**/*.model.js'],
};

module.exports = {
  spec() {
    return swaggerJSDoc(options);
  },
};
./server.js
const swaggerSpec = require('./config/swagger').spec();
const swaggerOptions = {
  customSiteTitle: 'My Service',
  customCss: '.topbar { display: none }',
};
app.use('/docs', swaggerUi.serve, swaggerUi.setup(swaggerSpec, swaggerOptions));
app.get('/docs.json', (req, res) => {
  res.setHeader('Content-Type', 'application/json');
  res.status(200).json(swaggerSpec);
});
In the above example, I split the swagger-jsdoc setup and the /docs route setup between two different modules; This was mostly to keep the server.js code clean. The config/swagger.js module pulls the host name and port from the environment so they can be set by the Infrastructure team, and other settings from the package.json file to reduce duplication. I also added the *.model.js glob to the apis property as I will be documenting the models to.
Did you notice the last route? Since the Swagger documentation is all about the OAS and the point of OAS is to be readable by both humans and machines I felt that it might be worth it to make the raw OAS available for OAS compatible clients.
How to Document my API using JSDoc Comment Blocks
To be perfectly honest here, it is not super pretty. Alas its not standard JSDoc annotations. The way swagger-jsdoc works is that it looks for JSDoc comment blocks but instead of any standard JSDoc annotations we just use one custom one called @swagger. After that annotation we are to write out the OAS meta language in YAML 🙁
Why the sad face? YAML is tab based. When defining objects with nested properties YAML relies on the tabbing (or spacing) to understand hierarchal relationships. If your nested property is off by one space YAML will see it as a sibling property at best or a syntax error at worst. Its not the end of the world; YAML is less verbose then JSON so as comment block text go its probably nicer. Just remember watch your spaces!
It is not nearly as pretty as I would have hoped but it’s the same OAS language as you’d have written if you just wrote one JSON/YAML file… except you have to use YAML.
I still think it’s the better options as it keeps the documentation with the implementation but I concede that it’s not as nice as it could have been.
Here is an example of documenting a simple /status route.
/**
 * @swagger
 * tags:
 *   - name: status
 *     description: Is the service in a good state
 */

module.exports = {
  /**
   * @swagger
   * /status:
   *   get:
   *     description: |
   *       The service will offer a status endpoint which can be accessed via a HTTP GET request.
   *       It will return a status 200 and a body message if the service is in a good state.
   *     tags:
   *       - status
   *     produces:
   *       - application/json
   *     responses:
   *       200:
   *         description: OK
   *         schema:
   *           type: object
   *           properties:
   *             name:
   *               type: string
   *               description: The name of the service.
   *             version:
   *               type: string
   *               description: The version of the service.
   *             message:
   *               type: string
   *               description: The status message describing the state of the service.
   *         examples:
   *           application/json: |-
   *             {
   *               "name": "@bvanderlaan/my-service"
   *               "version": "1.0.0"
   *               "message": "up and running"
   *             }
   */
  get(req, res) {...},
};
The first block defines tags. Tags are used to group APIs in the documentation. Each API that we define with the status tag will be grouped in a collapsible <section> in the documentation.
The second block is where we define the /status route. The first line under the @swagger pragma is the route path; if our status route was versioned we’d have to write /v1/status but in this example, it is not so it’s just /status.
Next we defined the METHOD as get: followed by the description. In this example notice the use of the |, this is a YAML notation to allow for multi-line strings. If your description is just a single line you can write it inline description: my short description.
We then add the tags as we talked about above and state that this API will return JSON. If the API supports multiple output formats you can list each one. This will generate a drop down in the documentation allowing users to pick which output format they want to try out.
Notice the use of
-under theproducesproperty. This is YAML notation for an array. Theproducesproperty is an array and each line under it, starting with a-, is an element in the array.
Lastly, we define the responses. In the case of the /status route we have only one: 200. If we had more we can list each one out under the responses property. Each response can have a description and if a body is returned you can define it via the schema property. Our status route returns a JSON object with three properties: name, version, and message.
If you have a number of API which all return the same JSON you can define the schema, or model, in a separate comment block and reference it here via the
#refkeyword. For example if you have *.model.js files you might define the models there and reference them in your controllers comment block. This way you can reuse the model definition.
The above comment blocks will cause swagger-jsdoc and swagger-ui-express to generate the following documentation:
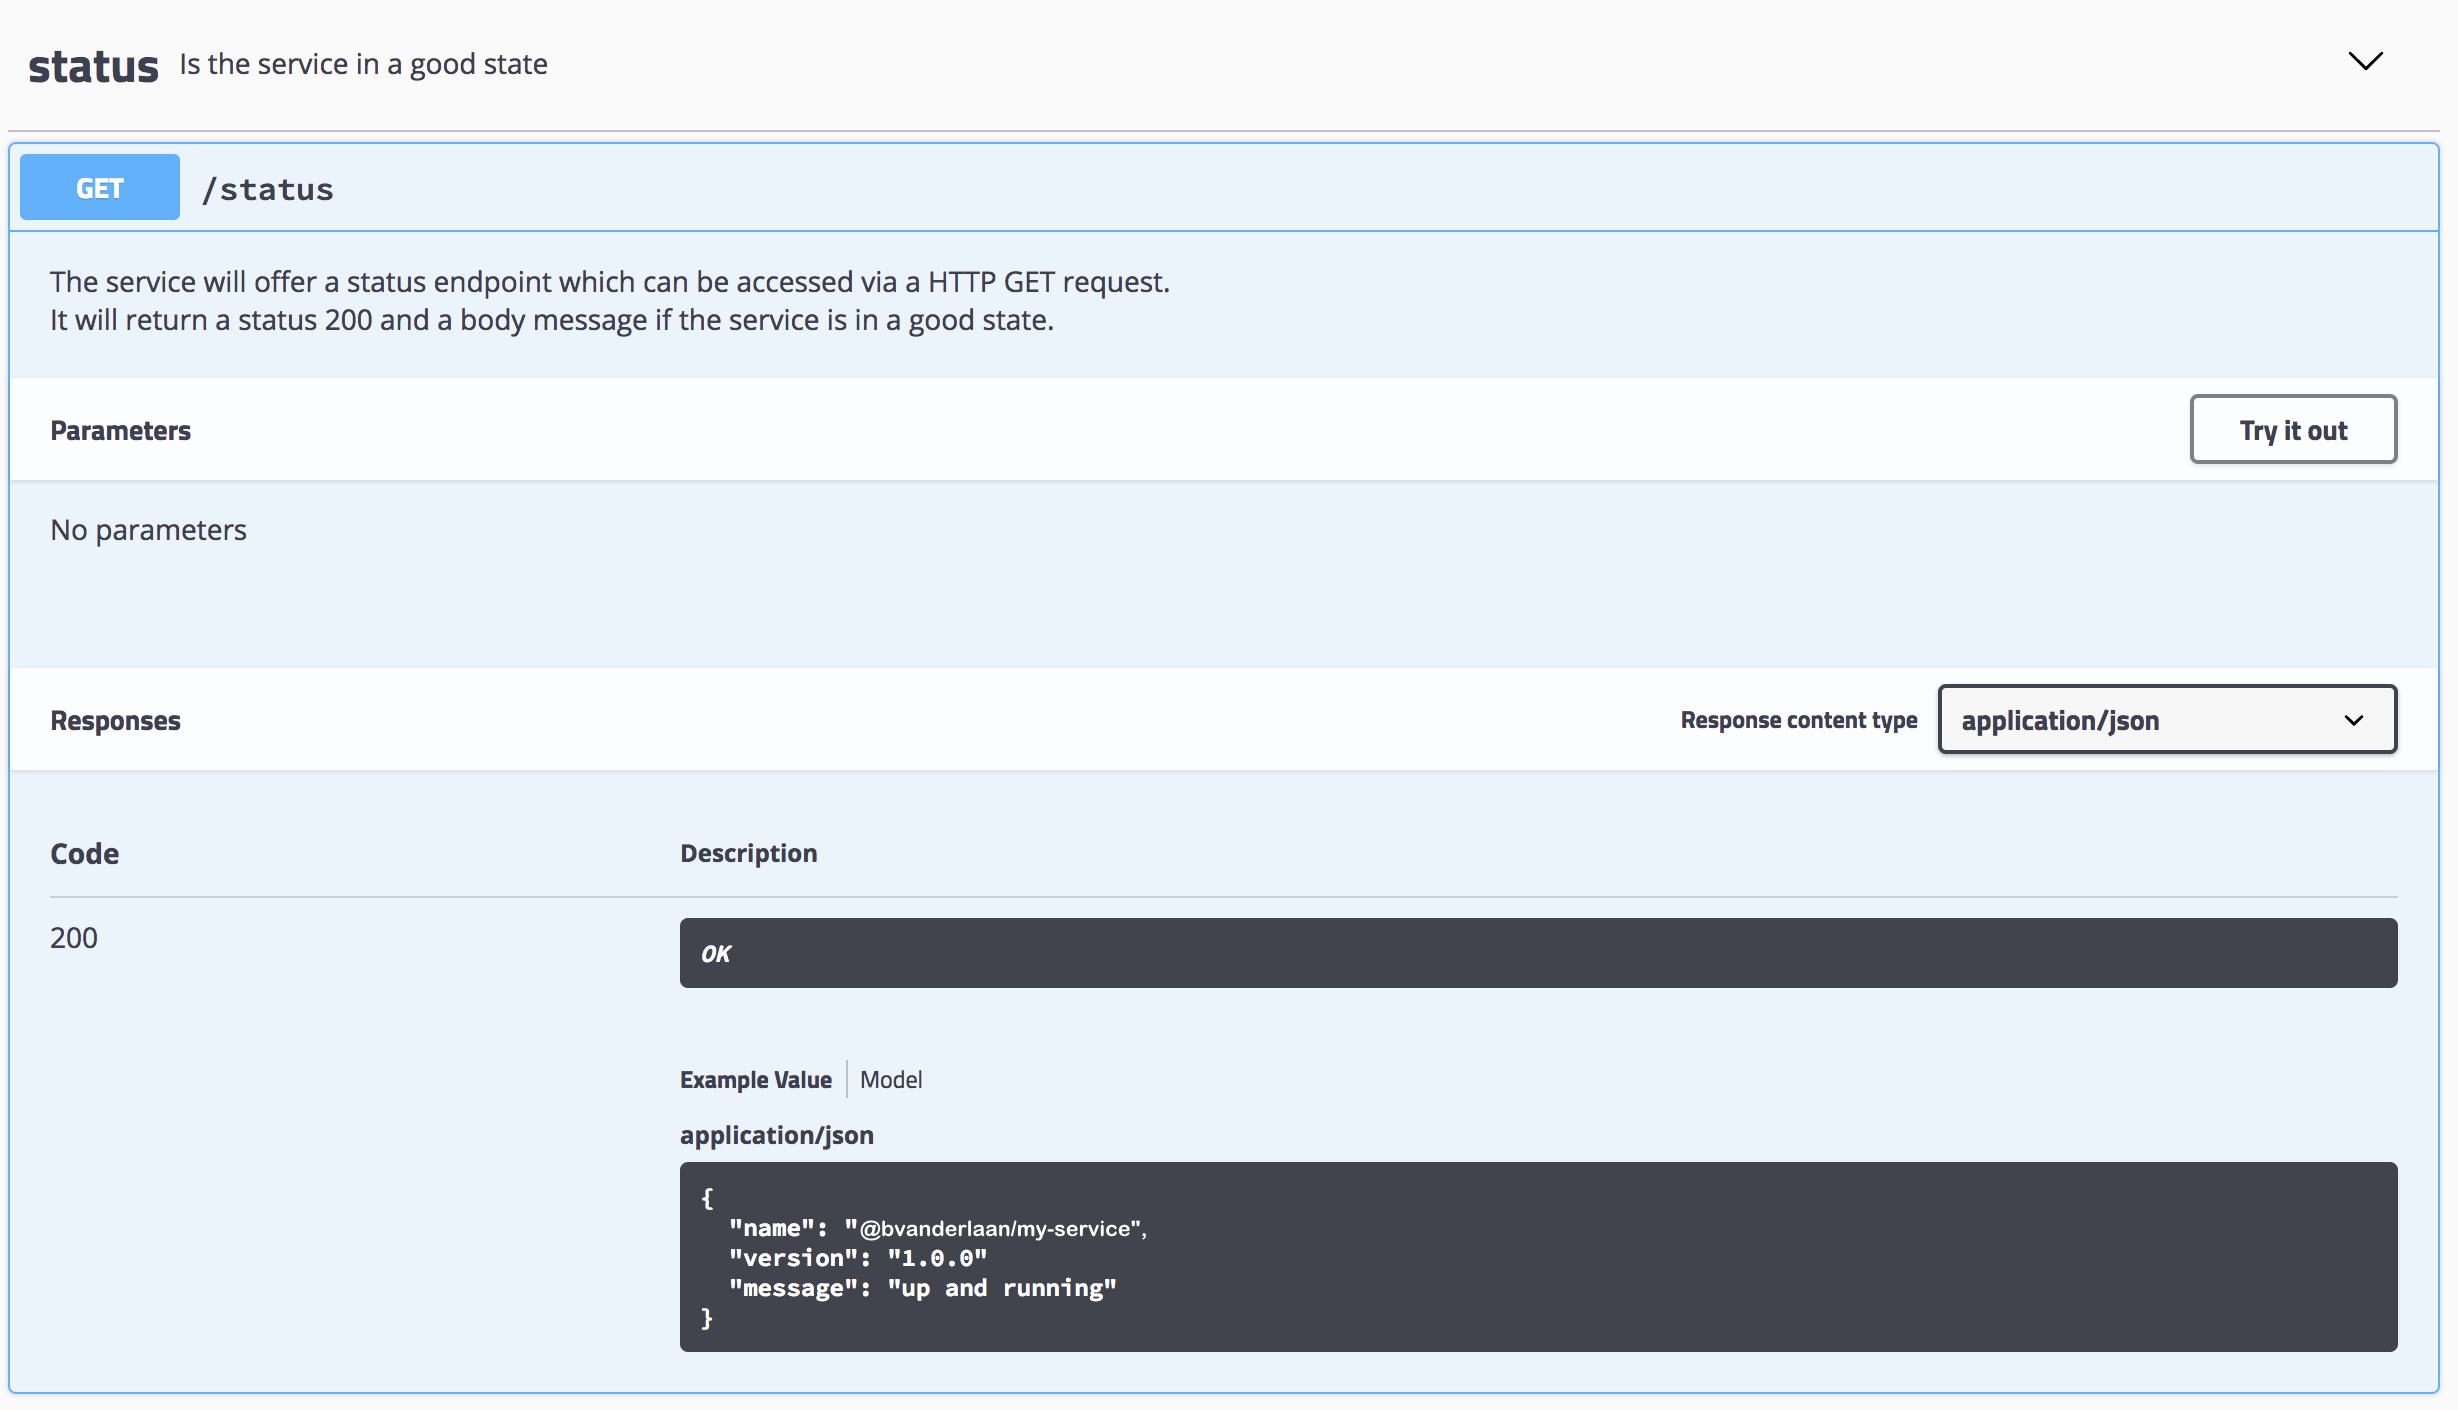
I can then click the Try it out button to expose a form that allows me to call the API:
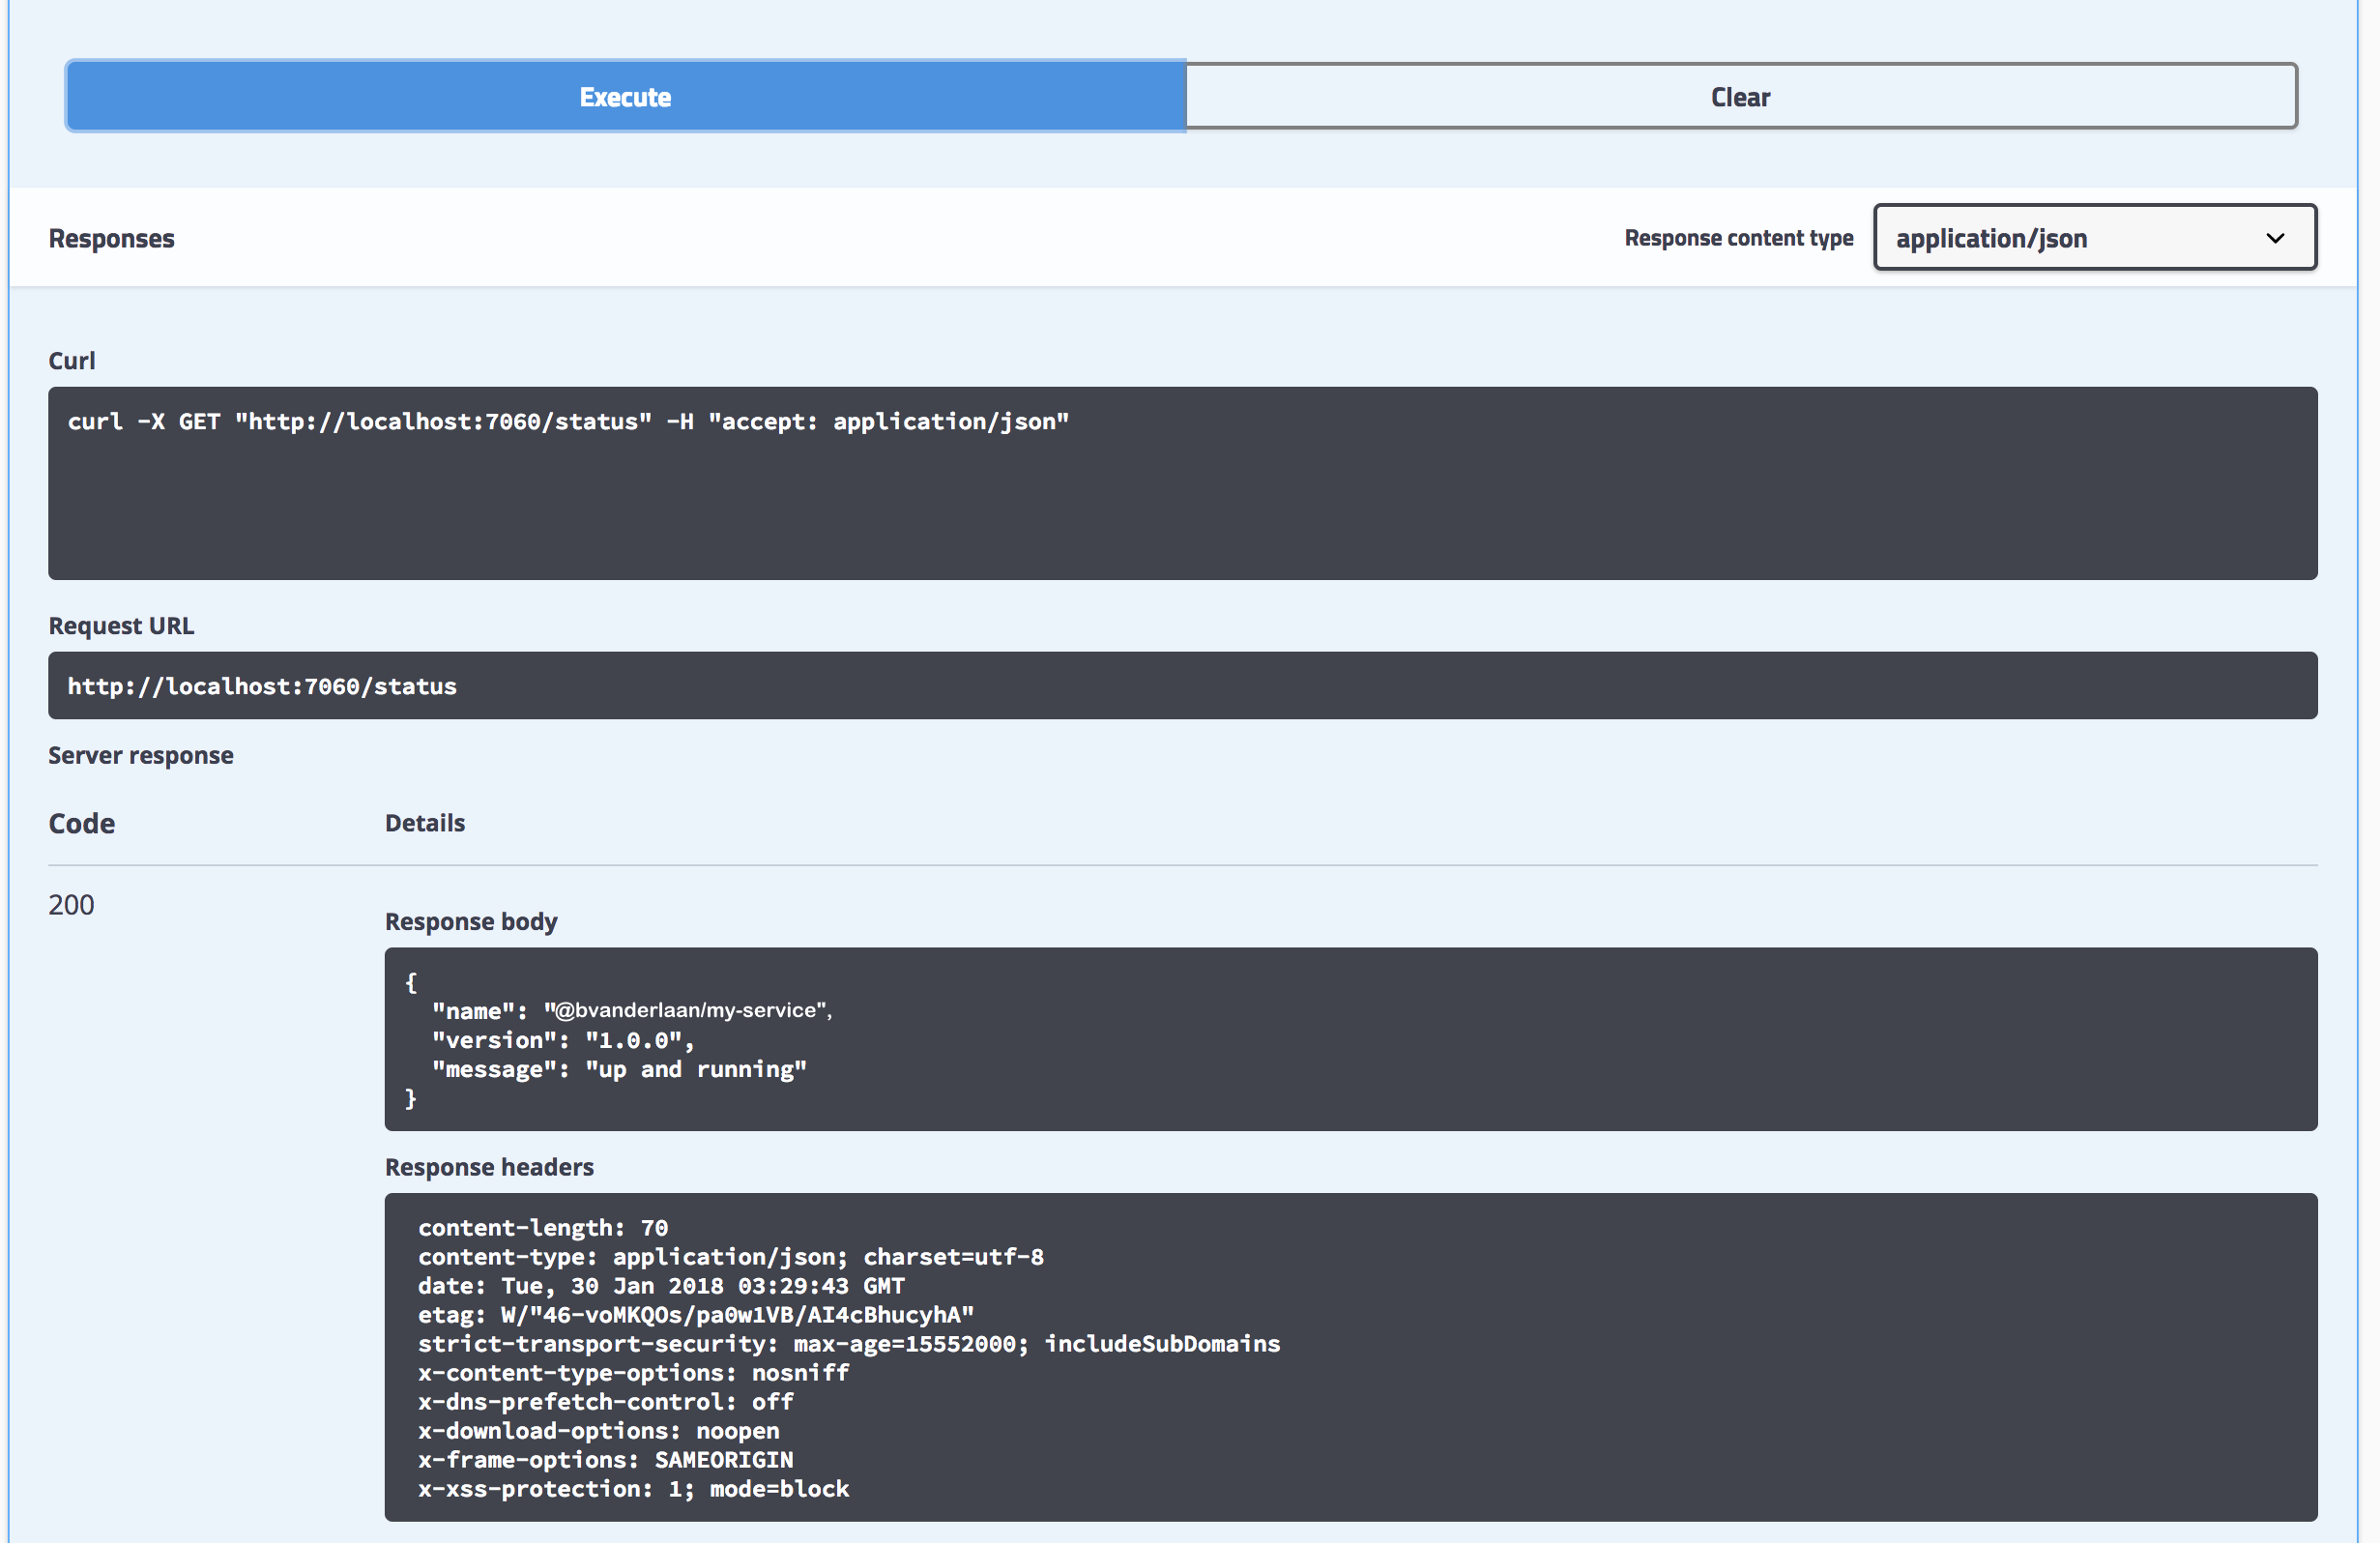
The YAML based comment blocks are not super nice however the outcome is pretty snazzy.
There you have it that is how you can use Swagger to document your Node.js API services and can even auto-generate and self-host the documentation via modules like swagger-ui-express and swagger-jsdoc.
I hope that was helpful, if you have any questions feel free to reach out I’m happy to help.
Until next time think imaginatively and design creatively