Writing your First QtQuick Program
By: Brad
In Creating your first Qt Quick Project we created a simple Hello World QtQuick project. Lets now try writing a more useful QtQuick application; how about a simple calculator that does addition and subtraction. Lets start modifying the Hello World program that was auto generated in our QMLSampleApplication project.
Lets start by changing the colour of our application background from white to a blue-ish colour. We do this by setting the color (US spelling as usual) property for the root Rectangle element. This property takes a string and can either be a pre-defined colour (like “white”, “black”, “lightgray”, etc.) or a HTML colour hex value (like “#FFFFFF”, “#000000”, “#C0C0C0”, etc.); it can also take the string transparent to make the element clear. Next lets get ride of the all encompassing MouseArea and replace it with an exit button.
import QtQuick 2.0

Rectangle {
    width: 360
    height: 360
    color: "#6B95FF"

    Rectangle {
        id: exitButton
        anchors.right: parent.right
        anchors.top: parent.top
        anchors.margins: 2
        opacity: 0.5
        border.color: "black"
        border.width: 2
        radius: 5
        width: exitButtonText.implicitWidth + (exitButtonText.anchors.margins * 2)
        height: exitButtonText.implicitHeight + (exitButtonText.anchors.margins*2)
        color:  exitButtonMouseArea.pressed ? Qt.darker(parent.color, 1.5) : "transparent"

        MouseArea {
            id:  exitButtonMouseArea
            anchors.fill: parent
            onClicked: {
                Qt.quit();
            }
        }
        Text {
            id: exitButtonText
            anchors.horizontalCenter: parent.horizontalCenter
            anchors.verticalCenter: parent.verticalCenter
            anchors.margins: 4
            anchors.fill:parent
            font.family: myResult.font.family
            font.pointSize: 16
            text: "Close"
            color: "black"
        }
    }
}
There is a lot going on with the exit button so lets break it down shall we.
For starters I could have used a QtQuick Controls button object but making buttons in QML is so darn easy I just made my own. I did this by adding a Rectangle element which I gave a reference ID of exitButton via the optional id property. I used the anchors property to position the exit button in the top right corner of the application window with a 2 pixel margin.
I also wanted the button to look like a button vs. a rectangle so I gave it some rounded corners via the radius property and a 2 pixel thick black border. Lastly for fun I gave it a opacity value of 50% so it will be partly see through.
Rectangle {
    id: exitButton
    anchors.right: parent.right
    anchors.top: parent.top
    anchors.margins: 2
    opacity: 0.5
    border.color: "black"
    border.width: 2
    radius: 5
}
The next properties I set in the exitButton Rectangle is its width, height, and color values. For all three of these I reference the ids of other Elements in the script (not shown in the below code snippet). For the width and height I’m getting the implicitWidth and implicitHeight from the child Text element. Where the width property is an explicitly set value the implicitWidth is the actual width of the element (in this case the actual width of the text). One can set the width property to be smaller or larger then the implicitWidth it just means you might take up more room then needed or have content bleeding outside your borders. In this case I want my exit button to be just big enough to fit the text I choose to display in the button so I set my explicit width of the Rectangle to be same size as the implicit width of the text plus some margin value. I do the same for the height; by doing this my exit button should automatically scale with any font size changes.
    width: exitButtonText.implicitWidth + (exitButtonText.anchors.margins * 2)
    height: exitButtonText.implicitHeight + (exitButtonText.anchors.margins*2)
    color:  exitButtonMouseArea.pressed ? Qt.darker(parent.color, 1.5) : "transparent"
The color property above is an example of a conditional binding.
Here what I’m saying is that if the boolean property pressed of the MouseArea with the id of exitButtonMouseArea is true (which it is when the user holds down the mouse button) then bind the color property of this Rectangle to the same colour as its parent (i.e. #6B95FF) but 1.5 times darker. If the pressed property equates to false then make the colour transparent.
color: exitButtonMouseArea.pressed ? Qt.darker(parent.color, 1.5) : "transparent"
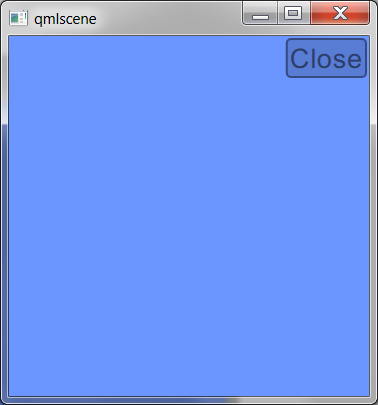
What we’ll get is an exit button whose background is the same colour as our parent window but while the user is clicking it will darken slightly to give the impression of being pressed down.
Notice that this inline if statement is JavaScript and could have also been written like so.
color:  {
    var returnValue = "transparent"
    if ( exitButtonMouseArea.pressed ) {
         returnValue = Qt.darker(parent.color, 1.5)
    }
    return returnValue;
}
The MouseArea element is unchanged from our original Hello World program say for the fact that I gave it an id so I could reference in the above if statement and that its now inside the exitButton Rectangle. Because of this change in location its parent keyword now reference the exitButton Rectangle therefore the anchors.fill: parent statement will instead of making the MouseArea the same size as the application window will now only makes it the same size as the exitButton Rectangle.
Lastly I added a Text element in the exitButton Rectangle to show the text “Close” (a.k.a the button label). Here the button label will be centered both horizontally and vertically in the button; use the same font family as the myResults Text element (not shown below), and a font size of 16 Points. Notice here that the property that sets the font size is called font.pointSize indicating that this integer value is not in pixels but in points. There is also a font.pixelSize property if a font size in pixels is needed.
     MouseArea {
        id:  exitButtonMouseArea
        anchors.fill: parent
        onClicked: {
            Qt.quit();
        }
    }
    Text {
        id: exitButtonText
        anchors.horizontalCenter: parent.horizontalCenter
        anchors.verticalCenter: parent.verticalCenter
        anchors.margins: 4
        anchors.fill:parent
        font.family: myResult.font.family
        font.pointSize: 16
        text: "Close"
        color: "black"
    }
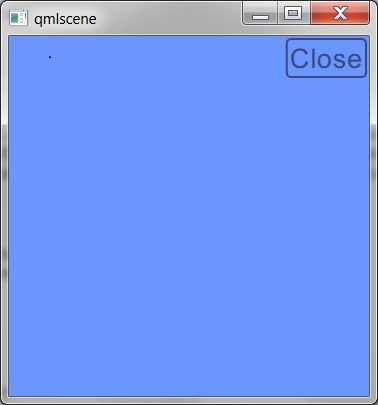
If we build what we have so far we’ll get a undefined reference error since we’re referencing a so far non-existing element named myResults. Because we’re loosely binding this won’t manifest itself as a compiler error but rather a run time error (the admittedly down side of the magic of Declarative GUI Architecture, but one I’m willing to live with as the magic is really really cool). But just to show you what the above code would render if it did know about the myResults item you would get a blue-ish application window with an exit button in the top right corner that when clicked will darken a little and terminate the application.
Now lets add two fields, one that shows the users input and one that shows the calculated results.
import QtQuick 2.0

Rectangle {
    width: 360
    height: 360
    color: "#6B95FF"

    Rectangle { id: exitButton...}
    Column {
        anchors.left: parent.left
        anchors.right: parent.right
        anchors.top: exitButton.bottom
        anchors.bottom: parent.bottom
        anchors.margins: 10
        spacing: 10

        Rectangle {
            id: myResultRect
            anchors.left: parent.left
            anchors.right: parent.right
            height: myResult.implicitHeight + 10
            border.color: "#663FFF"
            border.width: 5
            color: "transparent"
            clip: true

            Text {
                id: myResult
                anchors.right: parent.right
                anchors.rightMargin: 10
                anchors.verticalCenter: parent.verticalCenter
                color: "#663FFF"
                font.family: "Arial"
                font.pointSize: 14
                font.bold: true
                text: "0"
            }
        }
        Rectangle {
            id: userInputRect
            anchors.left: parent.left
            anchors.right: parent.right
            height: userInput.implicitHeight + 10
            color: "white"
            clip: true

            Text {
                id: userInput
                anchors.right: parent.right
                anchors.rightMargin: 10
                anchors.verticalCenter: parent.verticalCenter
                color: "black"
                font.family: myResult.font.family
                font.pointSize: myResult.font.pointSize
                text: "0"
            }
        }
    }
}
QtQuick has a number of positioners (Column, Row, Grid, Flow) which you can use to place elements in relation to each other. In the above we added a Column element so we can arrange the new elements one on top of each other.
Column {
    anchors.left: parent.left
    anchors.right: parent.right
    anchors.top: exitButton.bottom
    anchors.bottom: parent.bottom
    anchors.margins: 10
    spacing: 10
}
The Column element extends from the Item element so it supports the anchors property. Here we are telling the Column to anchor to the left and right edges of its parent therefore making it be as wide as the application window. We use anchors vs. explicit setting the width of the Column so that it will scale with the application if it is re-sized. We also anchor it to the bottom of the parent and the button of the exit button. This puts the Column directly below the exit button and makes it fill the remaining of the applications height.
Positioners provide a new property called spacing which allows one to specify how much of a gap to put between elements placed within the positioner. Here we tell the Column to leave a 10 pixel space between each child element.
    Rectangle {
        id: myResultRect
        anchors.left: parent.left
        anchors.right: parent.right
        height: myResult.implicitHeight + 10
        border.color: "#663FFF"
        border.width: 5
        color: "transparent"
        clip: true

        Text {
            id: myResult
            anchors.right: parent.right
            anchors.rightMargin: 10
            anchors.verticalCenter: parent.verticalCenter
            color: "#663FFF"
            font.family: "Arial"
            font.pointSize: 14
            font.bold: true
            text: "0"
        }
    }
The first element we place inside the Column positioner is a Rectangle that contains a Text element in order to show our calculated results right aligned inside a blue-ish rectangle. Notice the clip property; this property comes from the Item element so all QML Elements support it. This property takes a boolean; When true then any child elements who may exceed the explicit width/height of the parent element will only render the parts that show within the parent. That is if you have a parent item that is 100 pixels wide and it contains a child element that is 200 pixels wide only the first 100 pixels will be rendered (no bleeding). If the clip property is false then child elements will be allows to draw out side the borders of its parent (this is the default value of this property). Below we set the clip value to true for the myResults Rectangle so if the user calculates a really large value it wont exceed the myResults Rectangle.
Column {
    anchors.left: parent.left
    anchors.right: parent.right
    anchors.top: exitButton.bottom
    anchors.bottom: parent.bottom
    anchors.margins: 10
    spacing: 10

    Rectangle {id: myResultRect...}
    Rectangle {
        id: userInputRect
        anchors.left: parent.left
        anchors.right: parent.right
        height: userInput.implicitHeight + 10
        color: "white"
        clip: true

        Text {
            id: userInput
            anchors.right: parent.right
            anchors.rightMargin: 10
            anchors.verticalCenter: parent.verticalCenter
            color: "black"
            font.family: myResult.font.family
            font.pointSize: myResult.font.pointSize
            text: "0"
        }
    }
}
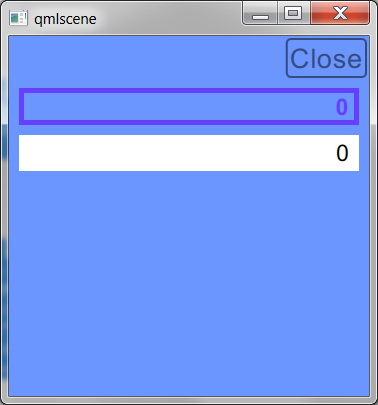
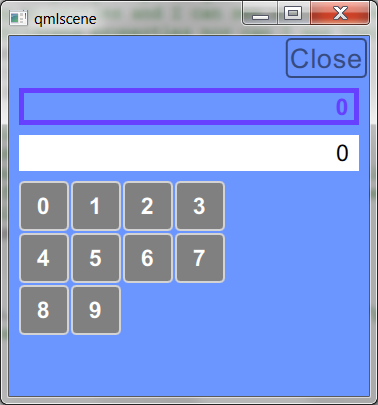
If you run the program now you’ll get the following:
Now lets add the buttons to the UI so that we can start inputting commands into the application.
QtQuick also has a number of view elements that you can connect to a view model. At the time of writing QtQuick contains a ListView, TableView, and a GridView to name a few, but no tree view. The GridView will layout the visual representation of the data in the view model as a grid (rows and columns). Since the buttons on a calculator are layout in a grid we’ll use the GridView to layout our buttons.
GridView {
    anchors.top: parent.top
    anchors.bottom: parent.bottom
    model: 10
    cellWidth: 52
    cellHeight: 52
    delegate: MyButton {
                font: myResult.font
                labelText: index
                labelColour: "white"
                width: 50
                height: 50
            }
}
Notice the model property, this is how you can provide the view with the view model to use. Since all we are doing is displaying 10 numerical buttons I’m just binding the model property to a literal numerical model that contains 10 numbers (0-9) done simply by typing the number 10.
The delegate property is the other primary property used when dealing with views in QtQuick. The delegate property allows you to define what the visual representation of the data in the view model is. If your familiar with MVVM think of the delegate as the view, the model as the view model and the GridView as a container that is part of another view.
So what we’re declaring above is a GridView that shows 10 elements where each cell in the grid is 52 pixels by 52 pixels. What is rendered within each cell of the GridView is a MyButton element.
The MyButton element is not a QtQuick Control or QtQuick Primitive but a custom QtQuick element that we are about to create.
As stated previously QML scripts can be separated into different files. Each QML script file represents a single element; that element might contains many many children elements and be quite complex but externally its seen as a single QtQuick element. Case in point our application so far if imported by another application would be seen as a single element. The name of the QML script file is important as it defines the name of the QtQuick element.
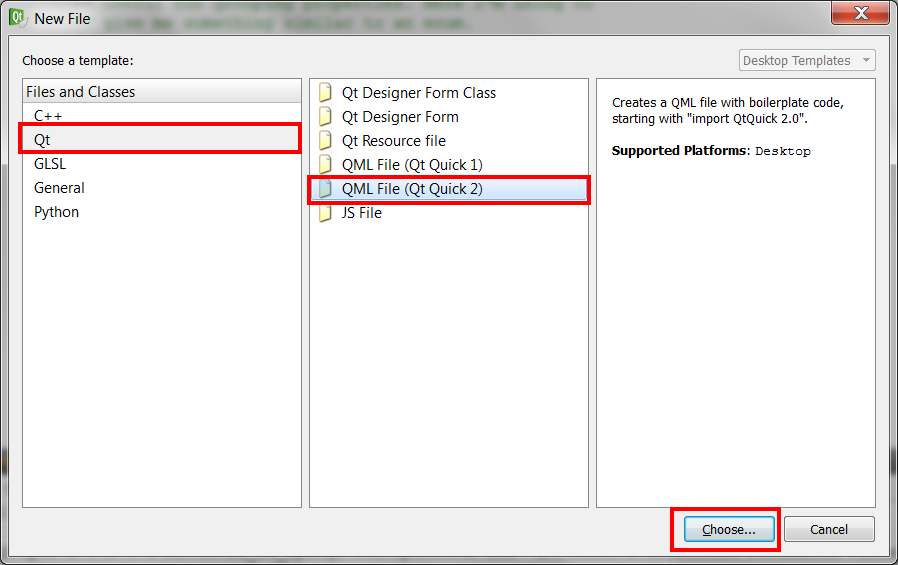
Right click on the QMLSampleApplication project folder in QtCreator and select Add New… then in the New File dialog pick Qt under the Class and File menu on the left hand side of the dialog. Now pick QML File (QtQuick 2) then click Choose….
In the Name input field type MyButton then click Next then Finish to create a new QML file MyButton.qml.
This new file will have some boiler plate code, replace it with the following which will create a custom button much like we did for the exit button.
import QtQuick 2.0

Item {
    id: myButton
    height: buttonLabel.implicitHeight + 10

    property alias font: buttonLabel.font
    property alias labelColour: buttonLabel.color
    property alias labelText: buttonLabel.text

    signal buttonClicked( string num )

    Rectangle {
        anchors.fill: parent
        color: buttonMouseArea.pressed ? Qt.darker("gray", 1.5) : "gray"
        border.color: "lightgray"
        border.width: 2
        radius: 5

        Text {
            id: buttonLabel
            anchors.verticalCenter: parent.verticalCenter
            anchors.horizontalCenter: parent.horizontalCenter
        }
        MouseArea {
            id: buttonMouseArea
            anchors.fill: parent
            onClicked : {
                // JavaScript
                // Right here I'm emitting the buttonClicked signal
                buttonClicked( buttonLabel.text )
            }
        }
    }
}
The above is pretty similar to our exit button script except we’ve added a buttonClicked signal that has a string parameter so when the button is clicked the consumer of this element will know about it and the label of the button that was clicked.
Looking back at the QMLSampleApplication.qml script at the delegate of the GridView you can see that each of the 10 cells in the GridView will render a MyButton element that is 50 pixels by 50 pixels. Notice the labelText property, its an alias properties that is giving us access to the text property of an internal Text element within the MyButton object. The QtQuick view’s such as the GridView support the special keyword index. Each cell in the grid has its own index by using the index keyword to supply the button label we’ll end up with a grid of 10 number buttons where each button will show their respective numerical value.
If your wondering how QMLSampleApplication.qml found the declaration of MyButton since we didn’t explicitly import it with the import keyword that is because when QtQuick parses QMLSampleApplication.qml and see the unknown MyButton element it will look for a QML file named MyButton.qml for the definition of what a MyButton is. QtQuick will look in the same directory that QMLSampleApplication.qml is saved for other QML files which happens to be where we saved MyButton.qml. If we had put MyButton.qml under a sub folder we would have then had to use the import statement.
import "mySubFolder"
Notice that we needed to use the quotation marks here because we are defining a relative directory path vs. a module name. We can also reference sibling directories by used the “../” syntax.
delegate: MyButton {
            font: myResult.font
            labelText: index
            labelColour: "white"
            width: 50
            height: 50
        }
Now lets add the action buttons addition, subtraction, equals, and clear. Since we want these buttons to be on the right hand side and not in the grid with the numerical buttons lets use a new element called RowLayout.
In QtQuick 2 we get a new type of elements which are meant to assist in laying out elements on your UI. They are RowLayout, ColumnLayout, and GridLayout to name a few. They differ from their respective positioners cousins (Row, Column, and Grid) in that they include width/height vs. just the elements position (x/y). That is your able to, for example, place three Rectangles in a ColumnLayout but tell the last Rectangle to take up the remaining height left in the layout element. A positioner is only about placing elements they have no implicit concept of the amount of space each child element is taking up.
These Layouts are not part of the core QtQuick module so we need to add another import statement.
import QtQuick 2.0
import QtQuick.Layouts 1.0
Again with the inconsistent versioning; yes the model version for QtQuick.Layouts is indeed 1 even though we are using QtQuick version 2. That is because Layouts didn’t exist in QtQuick version 1 so this is literally the first released version of the Layouts model therefore its version #1. There is something to be said about the cleanliness of .Net and its consistent version numbers (all models in .Net 4.0 are at version 4.0 even if that means they have to burn a version number or two to make them line up).
Below we add a RowLayout and move the GridView into that layout. We then add a Column positioner so that we can stack the action buttons one on top of each other, then we declare each action button manually.
Notice the Layout.fillWidth property; Each child of a layout is decorated with the Layout property. This is what allows us to tell one of the children in a Layout to adjust its width/height to take the remaining free space left in the layout.
 RowLayout {
            id: buttonRow
            anchors.left: parent.left
            anchors.right: parent.right
            height: 100
            spacing: 5

            GridView {
                Layout.fillWidth: true
                anchors.top: parent.top
                anchors.bottom: parent.bottom
                model: 10
                cellWidth: 52
                cellHeight: 52
                delegate: MyButton {
                            font: myResult.font
                            labelText: index
                            labelColour: "white"
                            width: 50
                            height: 50
                        }
            }

            Column {
                width: 100
                spacing: 5

                MyButton {
                    anchors.left: parent.left
                    anchors.right: parent.right
                    labelColour: "white"
                    labelText: "C"
                    font: myResult.font
                }
                MyButton {
                    anchors.left: parent.left
                    anchors.right: parent.right
                    labelColour: "white"
                    labelText: "-"
                    font: myResult.font
                }
                MyButton {
                    anchors.left: parent.left
                    anchors.right: parent.right
                    labelColour: "white"
                    labelText: "+"
                    font: myResult.font
                }
                MyButton {
                    anchors.left: parent.left
                    anchors.right: parent.right
                    labelColour: "white"
                    labelText: "="
                    font: myResult.font
                }
            }
        }
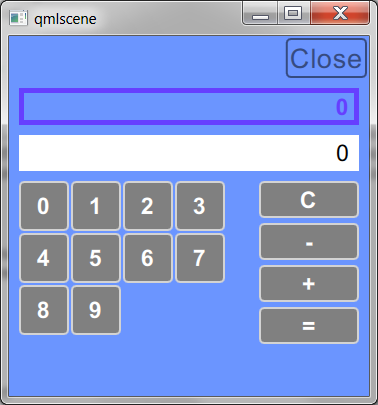
Now we have all our UI elements on the interface next lets start adding some functionality to the application.
First lets make the numerical buttons do something by adding a body to their onButtonClicked slot (i.e. an event handler for the clicked event.
GridView {
    Layout.fillWidth: true
    anchors.top: parent.top
    anchors.bottom: parent.bottom
    model: 10
    cellWidth: 52
    cellHeight: 52
    delegate: MyButton {
                font: myResult.font
                labelText: index
                labelColour: "white"
                width: 50
                height: 50

                onButtonClicked: {
                    // num is the parameter passed into this slot when the signal is emitted
                    // see the signal definition in the MyButton.qml file.
                    if ( userInput.text === "0") {
                        userInput.text = num
                    } else {
                        userInput.text = userInput.text + num
                    }
                }
            }
}
The onButtonClicked slot is the auto generated slot for the buttonClicked signal we defined in MyButton.qml. When the MyButton object is pressed it emits that signal and passes in its label text. The above slot we just provided is JavaScript which will take the passed in text parameter and append it to the userInput Text element’s text property.
signal buttonClicked( string num )
...
onClicked : {
    // JavaScript
    // Right here I'm emitting the buttonClicked signal
    buttonClicked( buttonLabel.text )
}
Now if we run the application when you press the numerical buttons the number they represent will be appended to the userInput Text element (the white rectangle on the UI).
Now lets do the same to the addition button so that we can start calculating values. What we need the addition button to do is the first time its pressed have it store the existing value the user had inputted, this way allowing the user to input the second value. The second time the addition button is pressed we want it to add the first and second inputted values and display the result to the user in the myResult Text element.
To do this we’ll need to know if this is the first or second time the user has pressed the addition button so lets add a way to save the current operating state of the application.
In the RowLayout (buttonRow) lets define a QtObject to store the valid states this application can be in; in this case default or no operation state and the addition state.
Then lets define a mutable property that will hold the current state.
RowLayout {
    id: buttonRow
    anchors.left: parent.left
    anchors.right: parent.right
    height: 100
    spacing: 5

    QtObject {
        id: operationTypes
        readonly property int none: 0
        readonly property int addition: 1
    }

    property int operation: operationTypes.none

    ...
}
Now that we have a way to save state the first thing we should do in our slot is query the current state; if we are in the no operation state then its the first time we’ve pressed the addition button. In this state the slot needs to take the users inputted value and store it in the myResult Text element. If we’re not in that state then this must be the second time we’ve pressed the addition button therefore we need to add the two values together and store the resulted calculated value in the myResult Text element.
onButtonClicked: {
    var result;
    if ( buttonRow.operation === operationTypes.none ) {
        result = userInput.text
    } else {
        result = parseInt( myResult.text ) + parseInt( userInput.text )
    }

    myResult.text = result.toString();
    userInput.text = "0"
    buttonRow.operation = operationTypes.addition
}
Notice that we are using the JavaScript parseInt() and .toString() methods to convert the text values to integers for addition then back again.
Now as an example lets assume the act of adding two numbers together was a complicated bit of code taking multiple lines. We’d probably not want to put the addition algorithm right in our click event. Lucky in QML we can define JavaScript functions that we can co-locate complicated logic to and call that function from the click event handlers.
onButtonClicked: {
    var result;
    if ( buttonRow.operation === operationTypes.none ) {
        result = userInput.text
    } else {
        result = buttonRow.add( parseInt( myResult.text ), parseInt( userInput.text ) )
    }

    myResult.text = result.toString();
    userInput.text = "0"
    buttonRow.operation = operationTypes.addition
}

...

function add(A, B) {
    return A + B;
}
Just wanted to show you that you could do that.
We can now apply the same to the subtraction, clear, and equals buttons to complete the functionality of your first QML program.
Here is the complete example, you can download the source code here.
import QtQuick 2.0
import QtQuick.Layouts 1.0

Rectangle {
    width: 360
    height: 360
    color: "#6B95FF"

    Rectangle {
        id: exitButton
        anchors.right: parent.right
        anchors.top: parent.top
        anchors.margins: 2
        opacity: 0.5
        border.color: "black"
        border.width: 2
        radius: 5
        width: exitButtonText.implicitWidth + (exitButtonText.anchors.margins * 2)
        height: exitButtonText.implicitHeight + (exitButtonText.anchors.margins*2)
        color:  exitButtonMouseArea.pressed ? Qt.darker(parent.color, 1.5) : "transparent"


        MouseArea {
            id:  exitButtonMouseArea
            anchors.fill: parent
            onClicked: {
                Qt.quit();
            }
        }
        Text {
            id: exitButtonText
            anchors.horizontalCenter: parent.horizontalCenter
            anchors.verticalCenter: parent.verticalCenter
            anchors.margins: 4
            anchors.fill:parent
            font.family: myResult.font.family
            font.pointSize: 16
            text: "Close"
            color: "black"
        }
    }

    Column {
        anchors.left: parent.left
        anchors.right: parent.right
        anchors.top: exitButton.bottom
        anchors.bottom: parent.bottom
        anchors.margins: 10
        spacing: 10

        Rectangle {
            id: myResultRect
            anchors.left: parent.left
            anchors.right: parent.right
            height: myResult.implicitHeight + 10
            border.color: "#663FFF"
            border.width: 5
            color: "transparent"
            clip: true

            Text {
                id: myResult
                anchors.right: parent.right
                anchors.rightMargin: 10
                anchors.verticalCenter: parent.verticalCenter
                color: "#663FFF"
                font.family: "Arial"
                font.pointSize: 14
                font.bold: true
                text: "0"
            }
        }
        Rectangle {
            id: userInputRect
            anchors.left: parent.left
            anchors.right: parent.right
            height: userInput.implicitHeight + 10
            color: "white"
            clip: true

            Text {
                id: userInput
                anchors.right: parent.right
                anchors.rightMargin: 10
                anchors.verticalCenter: parent.verticalCenter
                color: "black"
                font.family: myResult.font.family
                font.pointSize: myResult.font.pointSize
                text: "0"
            }
        }
        RowLayout {
            id: buttonRow
            anchors.left: parent.left
            anchors.right: parent.right
            height: 100
            spacing: 5

            // The QtObject is a way to make a non-UI element
            // useful for grouping properties. Here I"m using to
            // give me something similar to an enum.
            QtObject {
                id: operationTypes
                readonly property int none: 0
                readonly property int addition: 1
                readonly property int subtraction: 2
            }

            property int operation: operationTypes.none

            GridView {
                Layout.fillWidth: true
                anchors.top: parent.top
                anchors.bottom: parent.bottom
                model: 10
                cellWidth: 52
                cellHeight: 52
                delegate: MyButton {
                            font: myResult.font
                            labelText: index
                            labelColour: "white"
                            width: 50
                            height: 50

                            onButtonClicked: {
                                // num is the parameter passed into this slot when the signal is emitted
                                // see the signal definision in the MyButton.qml file.
                                if ( userInput.text === "0") {
                                    userInput.text = num
                                } else {
                                    userInput.text = userInput.text + num
                                }
                            }
                        }
            }

            Column {
                width: 100
                spacing: 5

                // This is a custom control. I created a custom button element
                // and saved it in a file called MyButton.qml. When QtQuick parses
                // this QML and sees this 'unknown' element name it will look for files
                // that match that name for a definision. QtQuick will look in the same directory
                // that this file is saved for other QML files; if my element was in a sub folder I
                // could include it in the look up path by stating that relatvie path in an import statement above.
                MyButton {
                    anchors.left: parent.left
                    anchors.right: parent.right
                    labelColour: "white"
                    labelText: "C"
                    font: myResult.font
                    onButtonClicked: {
                        // This is JavaScript will read/write access to the attributes in the QML

                        myResult.text = "0"
                        userInput.text = "0"
                        buttonRow.operation = operationTypes.none
                    }
                }
                MyButton {
                    anchors.left: parent.left
                    anchors.right: parent.right
                    labelColour: "white"
                    labelText: "-"
                    font: myResult.font
                    onButtonClicked: {
                        var result;
                        if ( buttonRow.operation === operationTypes.none ) {
                            result = userInput.text
                        } else {
                            result = buttonRow.subtract( parseInt( myResult.text ), parseInt( userInput.text ) )
                        }

                        myResult.text = result.toString();
                        userInput.text = "0"
                        buttonRow.operation = operationTypes.subtraction
                    }
                }
                MyButton {
                    anchors.left: parent.left
                    anchors.right: parent.right
                    labelColour: "white"
                    labelText: "+"
                    font: myResult.font
                    onButtonClicked: {
                        var result;
                        if ( buttonRow.operation === operationTypes.none ) {
                            result = userInput.text
                        } else {
                            result = buttonRow.add( parseInt( myResult.text ), parseInt( userInput.text ) )
                        }

                        myResult.text = result.toString();
                        userInput.text = "0"
                        buttonRow.operation = operationTypes.addition
                    }
                }
                MyButton {
                    anchors.left: parent.left
                    anchors.right: parent.right
                    labelColour: "white"
                    labelText: "="
                    font: myResult.font
                    onButtonClicked: {
                        var result;
                        if ( buttonRow.operation === operationTypes.addition ) {
                            result = buttonRow.add( parseInt( myResult.text ), parseInt( userInput.text ) )
                        } else if ( buttonRow.operation === operationTypes.subtraction ) {
                            result = buttonRow.subtract( parseInt( myResult.text ), parseInt( userInput.text ) )
                        } else {
                            result = parseInt( userInput.text )
                        }

                        myResult.text = result.toString();
                        userInput.text = "0"
                        buttonRow.operation = operationTypes.none
                    }
                }
            }

            // These are JavaScript functions
            function add(A, B) {
                return A + B;
            }

            function subtract(A, B) {
                return A - B;
            }
        }
    }
}
import QtQuick 2.0

// Here i'm defining a custom element that I can reuse above
// It is a rectangle with rounded corners, a text label in the middle
// and when clicked will darken and emit a signal.
Item {
    id: myButton
    height: buttonLabel.implicitHeight + 10

    // I have to define alias in order to grant access to my childrens
    // properties to my parent. Property scope in QML is only one level deep.
    // My parent can see all my properties and I can see all my parent and siblings properties
    // but they can't see my childrens properties nor can I see their childrens properties.
    property alias font: buttonLabel.font
    property alias labelColour: buttonLabel.color
    property alias labelText: buttonLabel.text

    // This defines a custom signal. Note the slot for this signal
    // is auto generated and is named "onButtonClicked"
    // As this is a reusable button and I will have many in my application
    // I will define the slot for each instance of this custom element when
    // I include it in the application.
    signal buttonClicked( string num )

    Rectangle {
        anchors.fill: parent
        color: buttonMouseArea.pressed ? Qt.darker("gray", 1.5) : "gray"
        border.color: "lightgray"
        border.width: 2
        radius: 5

        Text {
            id: buttonLabel
            anchors.verticalCenter: parent.verticalCenter
            anchors.horizontalCenter: parent.horizontalCenter
        }
        MouseArea {
            id: buttonMouseArea
            anchors.fill: parent
            onClicked : {
                // JavaScript
                // Right here I'm emitting the buttonClicked signal
                buttonClicked( buttonLabel.text )
            }
        }
    }
}
And there you go you’ve written your very first QML application good for you; but don’t stop there please check out my other tutorials which go into more advanced topics like QtQuicks Model/View architecture and how to use C++ with your QML.
Thank you I hope you have enjoyed and found this tutorial helpful. Feel free to leave any comments or questions you might have below and I’ll try to answer them as time permits.
Until next time think imaginatively and design creatively
Thanks Brad, great explanation. Just learning QML and found your excellent tutorials.