How to use Qt Quick’s TreeView
By: Brad
On July 1st Qt release version 5.5 which included a number of improvements and new additions to the framework. One of the new arrivals in this version is the much sought after TreeView QML type. In this tutorial I’m going to show you how to use the new TreeView to present data which is organized in a tree.

You may be asking wait Qt’s had a tree view for a while now, that is you’d be saying that if you’ve never played with Qt Quick. In Qt Widgets you have QListView, QTableView, and QTreeView however in Qt Quick you only have ListView and TableView (where the TableView is really under the hood multiple ListViews (one for each column) wrapped in a nice API to make it look like a table) but no TreeView… until today.
Explanation of Qt Quick Views
First let me quickly explain the existing two views which are among the most commonly used views in Qt Quick.
ListView
The ListView is used to present data stored in a model in the form of a list and can use either the ListModel QML type, which stores data in the form of a list as its name implies, or a derivative of the QAbstractItemModel.
So if you create a model which stores its data like so:

Then define a ListView as follows you’ll get the following on screen when you run your application:
ListView {
       anchors.fill: parent
       model: myModel
       delegate: Rectangle {
           color: ( index % 2 == 0 ) ? "white" : "lightblue"
           anchors {left: parent.left; right: parent.right; }
           height: 20

           Text {
               anchors.verticalCenter: parent.verticalCenter
               anchors.left: parent.left
               text: display // display is the name of the role which holds the data we want to show here.
           }
       }
   }
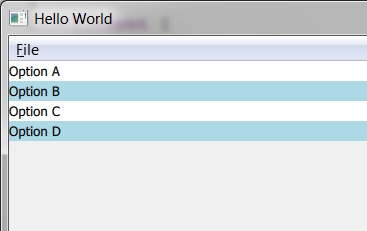
Note here that each entry shown in the view is of a data entry and since each data entry can have N number of roles the view has access to each one since its working on the entry as a whole. The roles are accessable through their role names which are strings that map to an actual role enum within the model (see QAbstractItemModel::roleNames() for more info).
TableView
The TableView is used to present data stored in a model in the form of a table, well sort of; in reality its better to think of the TableView QML type as a view used to present a list of Rows where each row can contain N number of data points you wish to show. This is a little different then the QTableView which is used in Qt Widgets which actually presents the data stored in a model in the form of a table.
My meaning here is that when using Qt Widgets and the QTableView the model you provide it stores its data in a row/column table so that each cell shows the same role but for a different entry within the model based on a row/column index.
Putting this model into a QTableView would mean that each cell in the table will show the Display Role but for a different row/column entry.
In order to achieve the same thing in Qt Quick instead of storing all your information under the same role instead think of your model as a list of Rows and place the data you want to show in each column all within the same row entry but under different roles.
Here is the code for the TableView:
TableView {
       anchors.fill: parent
       model: myModel
       itemDelegate: Rectangle {
           color: ( styleData.row % 2 == 0 ) ? "white" : "lightblue"
           anchors {left: parent.left; right: parent.right; }
           height: 20

           Text {
               anchors.verticalCenter: parent.verticalCenter
               anchors.left: parent.left
               text: styleData.value // this points to the role we defined in the TableViewColumn below; which one depends on which column this delegate is instantiated for.
           }
       }

       TableViewColumn {
           width: 100
           title: "Name"
           role: "display"
       }
       TableViewColumn {
           width: 100
           title: "Description"
           role: "description"
       }
   }
*Note the TableView has a default itemDelegate so we didn’t have to provide one but since the ListView does not have a default delegate I’m providing one to keep the views looking similar
So the QTableView (QWidgets) will show a different data entry for each cell where as the TableView (Qt Quick) will show a different role data for the given row entry in each cell.
Note here that unlike the ListView each cell delegate is NOT acting on a data entry but rather acting on a role. Because of this each cell delegate does NOT have access to any of the roles for the given data entry and only has access to the single role; this can be a source of pain requiring work a rounds in some cases so keep it in mind. The role data is accessed via the styleData attached property (see TableView::delegate property for more info).
Commercial break...
The New TreeView
Now for the new TreeView; So where as the above two views really worked on a list of data the TreeView actually works on a collection of data organized in a, wait for it, tree structure!
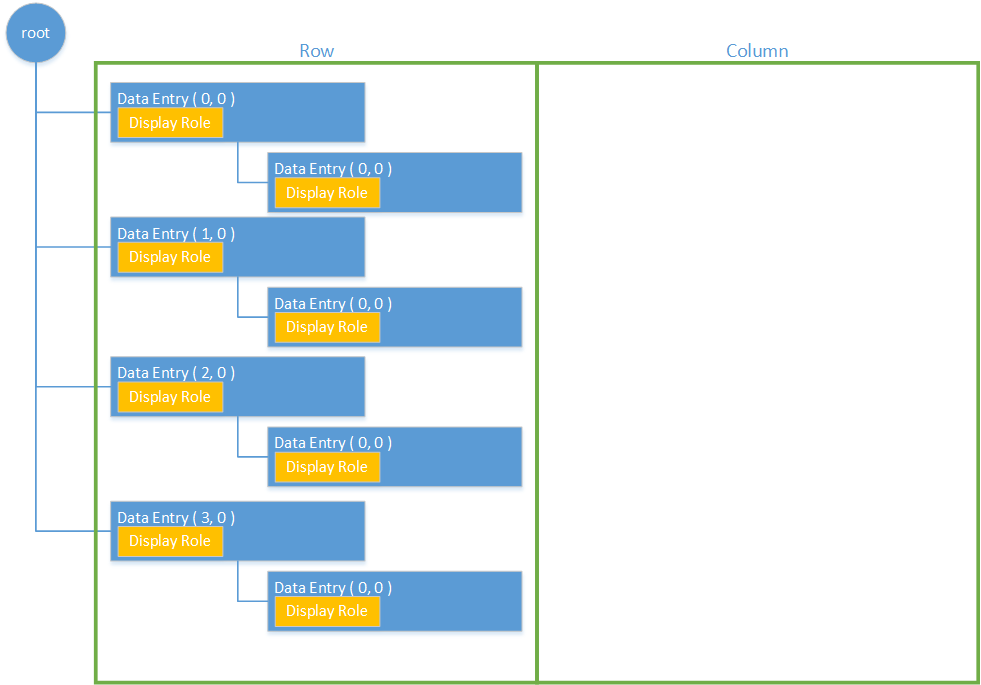
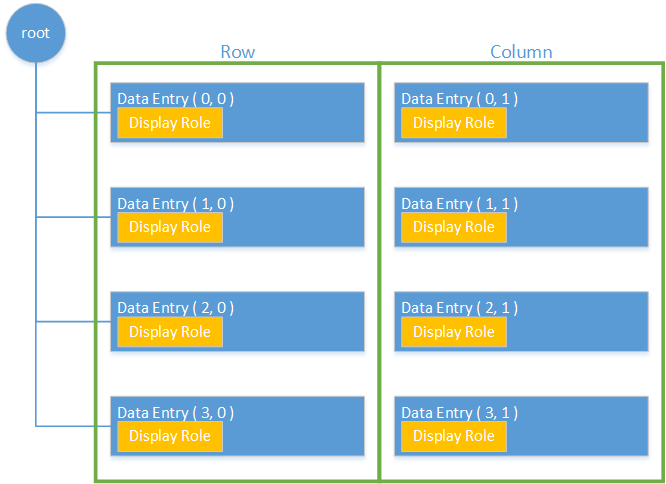
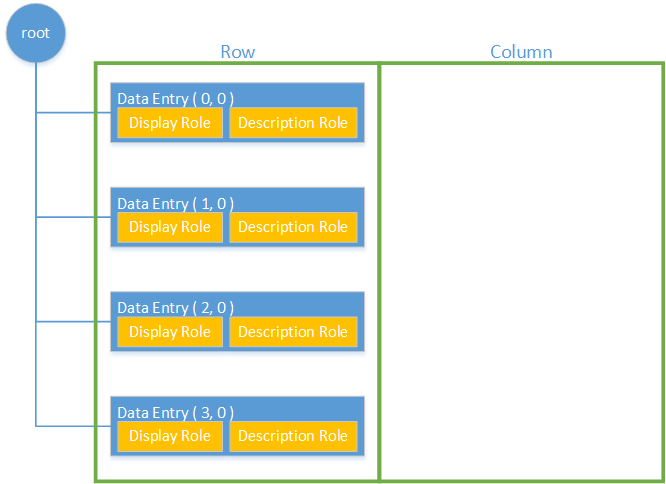
Now because the data needs to be organized in a tree structure we can no longer use the ListModel QML type to feed the TreeView but instead are limited to a derivative of the QAbstractItemModel. As you can see above we have a list of branches off the root where each branch in turn can have one or more leafs (in the above we only show one leaf). What roles we populate on each branch and leaf is completely up to us; in the diagram we show that we only set the Display role but we could have set the Display role on the branches and a custom Description role on the leafs if we so wanted to.
The TreeView itself is written out much the same way as the TableView; that is we define each column with the TableViewColumn QML type like we did in the TableView above. Yup TableViewColumn, we’re reusing code here, an alias might have been nice so we could write TreeViewColumn but hay at least we’re not copy-paste-modifying here 😉 .
TreeView {
        anchors.fill: parent
        model: theModel
        itemDelegate: Rectangle {
           color: ( styleData.row % 2 == 0 ) ? "white" : "lightblue"
           height: 20

           Text {
               anchors.verticalCenter: parent.verticalCenter
               anchors.left: parent.left // by default x is set to 0 so this had no effect
               text: styleData.value
           }
       }

        TableViewColumn {
            role: "name_role"
            title: "Name"
        }
        TableViewColumn {
            role: "description_role"
            title: "Description"
        }
    }
*Note like the TableView the TreeView has a default itemDelegate so we didn’t have to provide one but since the ListView does not have a default delegate I’m providing one to keep the views looking similar. Also note that the itemDelegate is applied to both the branches and the leafs; this is because a TreeView can present data N levels deep so it can’t provide N number of different item delegates. If you want to provide a different look to branches then you do leafs then you’ll have to implement that logic within your itemDelegate using either the styleData.depth, styleData.isExpanded, styleData.hasChildren, or styleData.hasSibling attached properties
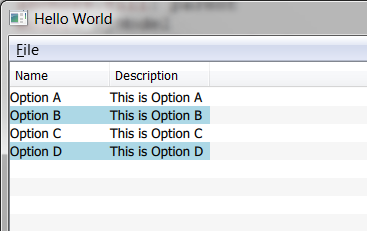
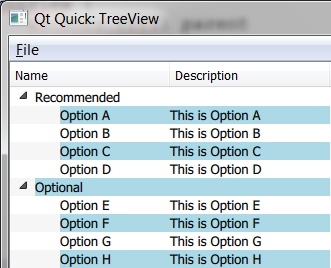
The above code will render the following when run:
Note here that like the TableView each cell delegate is acting on a role and NOT a data entry. Because of this each cell delegate does NOT have access to any of the roles for the given data entry and only has access to the single role; this can be a source of pain requiring work a rounds in some cases so keep it in mind. The role data is accessed via the styleData attached property (see TreeView::delegate property for more info).
There you have it, that is the quick and dirty on how to use the new TreeView to present your tree structured data.
You can find a sample application here on my GitHub
Thank you I hope you have enjoyed and found this tutorial helpful. Feel free to leave any comments or questions you might have below and I’ll try to answer them as time permits.
Until next time think imaginatively and design creatively
Hello Brad, I have followed your blog for a long time. I saw a lot of interesting article from you. It’s great if you can make a series about using QML effectively or maybe write a book relating to QML like : http://www.amazon.com/Illustrated-WPF-Experts-Voice-NET/dp/1430219106/ref=sr_1_1?ie=UTF8&qid=1436538516&sr=8-1&keywords=illustrated+WPF&pebp=1436494930540&perid=1NMZ7YXD5YKF53GJ9ZK7
You have a very strong background on WPF, and it is cool if you do that.I’m very intersting to contribute to your book (if possible)
Hi Brad,
“Note here that like the TableView each cell delegate is acting on a role and NOT a data entry. Because of this each cell delegate does NOT have access to any of the roles for the given data entry and only has access to the single role; this can be a source of pain requiring work a rounds in some cases so keep it in mind. ”
I think it’s pretty easy if you read the source code of TableViewItemDelegateLoader.qml (it is a private code in qtquickcontrol) To access any role you use use : model[your_role_name] . For exp: model[“comment”]
Could you please check it ?