Qt Quick Performance Tips – Rectangles
By: Brad
In this blog series I’m listing out different performance tips and tricks for Qt Quick to make sure you’re getting the best performance out of the scene graph renderer. In this post let’s talk about Rectangles.

How is a Rectangle Rendered on Screen?
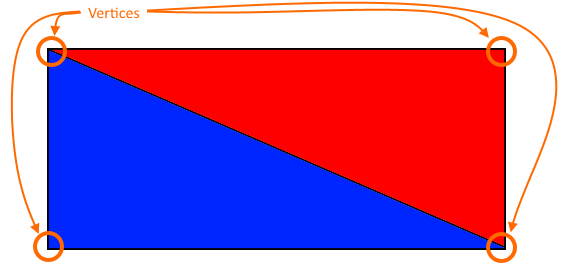
When you add a Rectangle element to your QML script the scene graph renderer draws it on screen by drawing four vertices (a point where two or more lines meet) which is used to create two triangles next to each other. It draws the vertices by making a call to the glDrawArrays() method. Lastly if you set the colour property of the rectangle to anything other then transparent it will use a shader program to do a solid colour fill on both triangles to produce a solidly coloured in rectangle (the below image shows the two triangles as different colours but that is just to highlight the fact that a rectangle is actually two triangles. In Qt Quick the value you set to the colour property of a Rectangle element will be applied to both triangles).

Setting your applications background colour without using a Rectangle
If your application has a background colour other than white you most likely have a root Rectangle element that is anchored to fill the screen. This will result in at least one glDrawArrays() call. A trick to by-pass this call is to use the QQuickWindow::setColor() method. This will let you specify which colour to use when the scene graph renderer calls glClear(). By default it clears using white but if your background needs to be black you could override this so that the scene graph fills the scene with black instead negating the need for a Rectangle.
Now instead of drawing something on screen to set your background colour you are just clearing everything off the screen.
import QtQuick 2.2
import QtQuick.Controls 1.1

ApplicationWindow {
    visible: true
    width: 640
    height: 480
    title: qsTr("Hello World")
    color: "black" // <-- QQuickWindow::setColor()

    Text {
        text: qsTr("Hello World")
        color: "white"
        anchors.centerIn: parent
    }
}
In the above notice the color property; ApplicationWindow is a sub class of the QML Window class which is of type QQuickWindow. The color property when set calls QQuickWindow::setColor() which in turn tells the reneder which colour to use when clearing the scene. Using this method is faster then clearing the scene to white, drawing 4 vertices, then filling the two generated triangles with a solid colour texture.
Rectangles as Containers
Another thing to keep in mind when using the Rectangle element is that if your just using it to group items together or to achieve proper spacing (i.e. center in parent) and are setting the Rectangles colour to transparent or to match the parents colour so as not to be visible to the user, the Rectangle element is still being rendered as a call to glDrawArray() to draw four vertices. If you set the colour to transparent it is simply not painting the Rectangle but it still drew all the vertices. The Rectangle will exist in the scene and will be looked at when the render is making decisions regarding the batching of elements. That is if your transparent Rectangle is over top of another element the render has to look at it to see if it needs to do extra work to apply an alpha-blend (which it won't as your Rectangle is 100% transparent), that is effort the render doesn't have to do since we intend this Rectangle to never be seen. A good alternative to a transparent Rectangle to save us from this extra effort is to use the Item element instead. The Item element is a non-visual element, it does not invoke the glDrawArray() method but can be used to group and center child elements. The point here is that you can save your self some rendering time by avoiding draw commands on elements the user will not be able to see by using a non-visual element like Item.
Instead of this:
import QtQuick 2.2
import QtQuick.Controls 1.1
import QtQuick.Layouts 1.1

ApplicationWindow {
    visible: true
    width: 640
    height: 480
    title: qsTr("Hello World")
    color: "black"

    ColumnLayout {
        anchors.fill: parent

        Rectangle {
            Layout.fillWidth: true
            height: 100
            color: "transparent"

            Text {
                text: qsTr("In this sample we show how using Rectangles to " +
                           "group and position visual elements can cause excessive " +
                           "vertices to be drawn. If we replace all the Rectangles with Items " +
                           " (a non-visual element) we can save our selves from rendering time.")
                horizontalAlignment: Text.AlignHCenter
                verticalAlignment: Text.AlignVCenter
                anchors.fill: parent
                anchors.margins: 20
                wrapMode: Text.WordWrap
                color: "white"
            }
        }
        Rectangle {
            Layout.fillWidth: true
            height: 100
            color: "transparent"

            Text {
                text: qsTr("Here is some center text.")
                anchors.centerIn: parent
                color: "white"
            }
        }
        Rectangle {
            Layout.fillHeight: true
            Layout.fillWidth: true
            color: "black"

            Text {
                text: qsTr("Here is some more centered text")
                horizontalAlignment: Text.AlignHCenter
                verticalAlignment: Text.AlignVCenter
                anchors.fill: parent
                color: "white"
            }
        }
    }
}
We can do this in order to save the render some work:
import QtQuick 2.2
import QtQuick.Controls 1.1
import QtQuick.Layouts 1.1

ApplicationWindow {
    visible: true
    width: 640
    height: 480
    title: qsTr("Hello World")
    color: "black"

    ColumnLayout {
        anchors.fill: parent

        Item {
            Layout.fillWidth: true
            height: 100

            Text {
                text: qsTr("In this sample we show how using Items to " +
                           "group and position visual elements can save the render from excessive " +
                           "drawing of vertices by using a non-visual element (Item) instead of a Rectangle")
                horizontalAlignment: Text.AlignHCenter
                verticalAlignment: Text.AlignVCenter
                anchors.fill: parent
                anchors.margins: 20
                wrapMode: Text.WordWrap
                color: "white"
            }
        }
        Item {
            Layout.fillWidth: true
            height: 100

            Text {
                text: qsTr("Here is some center text.")
                anchors.centerIn: parent
                color: "white"
            }
        }
        Item {
            Layout.fillHeight: true
            Layout.fillWidth: true

            Text {
                text: qsTr("Here is some more centered text")
                horizontalAlignment: Text.AlignHCenter
                verticalAlignment: Text.AlignVCenter
                anchors.fill: parent
                color: "white"
            }
        }
    }
}
Hope this helps,
If you have any questions feel free to leave a comment below and I'll try to answer them as time permits.
Until next time think imaginatively and design creatively