How to use Qt Quick’s VisualDataGroup
By: Brad
In this tutorial I’m going to show you how to use Qt Quick’s VisualDataGroup to re-organize a list of data in QML.
In QtQuick you have a View and a Data Model where the Data Model holds the data that the View will present to the user. Your Data Model may hold data that needs to be presented in a number of different ways. The different presentation views may only need to show a sub set of that data; In order to achieve this we need to present each View with a sub-set of the contents of the Data Model. We can do this via a Proxy Model such as the VisualDataModel with the use of a VisualDataGroup.
In QML there is a component called a VisualDataModel which is essentially a proxy model allowing you to sort or filter the contents of the Data Model before passing it along to the View. The VisualDataModel has a property called rootIndex which you can use in order to pick which branch of the Data Model (assuming its a Tree) to use in the View. There is also a component called a VisualDataGroup which can be used by a VisualDataModel to apply filtering and/or sorting to the data being retrieved from the Data Model.
Lets get started with some code shall we
First create a new Qt Quick UI project (*.qmlproject), remember this is a type of project that has only QML (no C++). Call your new project VisualDataGroup_Sample1.
In the VisualDataGroup_Sample1.qml file that gets auto generated per the Qt Quick UI project template add the following ListModel to act as our Data Model.
ListModel {
    id: myModel
    ListElement { role_display: "One"; role_value: 0; }
    ListElement { role_display: "One"; role_value: 2; }
    ListElement { role_display: "One"; role_value: 3; }
    ListElement { role_display: "One"; role_value: 4; }
    ListElement { role_details: "Two"; role_value: 5; }
    ListElement { role_details: "Three"; role_value: 6; }
    ListElement { role_details: "Four"; role_value: 7; }
    ListElement { role_details: "Five"; role_value: 8; }
    ListElement { role_details: "Six"; role_value: 9; }
    ListElement { role_keyID: "Seven"; role_value: 10; }
    ListElement { role_keyID: "Eight"; role_value: 11; }
    ListElement { role_keyID: "hello"; role_value: 12; }
}
Now we have a Data Model that has twelve (12) entries. Lets say we want to present only the entries that have the role_display role data. To do this we need to filter out all the other entries so that we’re left with only the four (4) entries who have the appropriate data. To do this we’re going to use a VisualDataModel to act as our Proxy Model.
VisualDataModel {
    id: displayVisualDataModel
    delegate: displayDelegate
    model: myModel
}
Here we told the displayVisualDataModel that its root model (or Data Model) is the myModel we created above and we’ve also told it how to represent the data on screen via its delegate property (we’ll defined displayDelegate later on as a Component).
If we plug this into a View as is we’ll get all 12 entries as we’ve not actually performed any sort of filtering on the data in the model.
Enters the VisualDataGroup
In order to actually filter the data before it gets to the View, so that it only presents a sub set of the data, we need to add a VisualDataGroup to the VisualDataModel component.
VisualDataModel {
    id: displayVisualDataModel
    delegate: displayDelegate
    model: myModel
    groups: [
        VisualDataGroup {
            includeByDefault: false
            name: "displayField"
        }
    ]
    filterOnGroup: "displayField"
}
Here we add a VisualDataGroup and give the group a distinctive name displayField. By setting the includeByDefault property to false we are telling the VisualDataGroup not to automatically include all the entries in the myModel Data Model into the displayField group. If we left it at this point the displayField group would be empty as all 12 entries from the myModel would be in the un-grouped section.
Now that we have a group that we can use we then tell the VisualDataModel (displayVisualDataModel) to filter its data on the displayField group via the filterOnGroup property. That is we are telling the VisualDataModel to only show entries that are part of the displayField group and filter out all entries which are not a member of this group. If we were to plug the displayVisualDataModel into a view now we would get zero (0) entries shown in the view. That is because at this point no entries in the myModel Data Model are members of the displayField group since we told the VisualDataGroup not to auto include the entries.
What we need to do now is start adding entries to the displayField group. I suppose we could do that in a number of different places; we could even do it dynamically via user input so that we could use a single view to show different sub sets of data per the user input. For this example lets just do it once during the Component.onCompleted event handler; that is once the VisualDataModel component has finished being initialized.
VisualDataModel {
    id: displayVisualDataModel
    delegate: displayDelegate
    model: myModel
    groups: [
        VisualDataGroup {
            includeByDefault: false
            name: "displayField"
        }
    ]
    filterOnGroup: "displayField"
    Component.onCompleted: {
        var rowCount = myModel.count;
        items.remove(0,rowCount);
        for( var i = 0;i < rowCount;i++ ) {
            var entry = myModel.get(i);
            if(entry.role_display !== undefined) {
                items.insert(entry, "displayField");
            }
        }
    }
}
Here using properties and functions of the ListModel I am looping through all twelve (12) entries that exist in myModel and for each entry I am checking to see if it contains the role_display Role. If it does I use the items property of the VisualDataModel, which is a reference to its default group and since we only have one its the VisualDataGroup that we setup called displayField, and add the given entry to said group. Now at the completion of the loop the displayField group will contain only the four (4) entries from myModel which have the role_display Role defined.
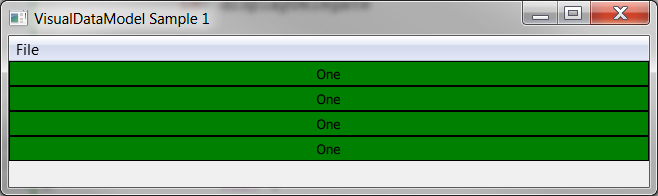
When I plug this into a View I'll see these four (4) entries displayed on the screen.
Here is the complete code example:
import QtQuick 2.2
import QtQuick.Controls 1.1
import QtQuick.Window 2.0

ApplicationWindow {
    title: qsTr("VisualDataModel Sample 1")
    width: 640
    height: 600
    menuBar: MenuBar {
        Menu {
            title: qsTr("File")
            MenuItem {
                text: qsTr("Exit")
                onTriggered: Qt.quit();
            }
        }
    }

    Item {
        id: root
        anchors.fill: parent
        readonly property int rowHeight: 25

        ListModel {
            id: myModel
            ListElement { role_display: "One"; role_value: 0; }
            ListElement { role_display: "One"; role_value: 2; }
            ListElement { role_display: "One"; role_value: 3; }
            ListElement { role_display: "One"; role_value: 4; }
            ListElement { role_details: "Two"; role_value: 5; }
            ListElement { role_details: "Three"; role_value: 6; }
            ListElement { role_details: "Four"; role_value: 7; }
            ListElement { role_details: "Five"; role_value: 8; }
            ListElement { role_details: "Six"; role_value: 9; }
            ListElement { role_keyID: "Seven"; role_value: 10; }
            ListElement { role_keyID: "Eight"; role_value: 11; }
            ListElement { role_keyID: "hello"; role_value: 12; }
        }
        VisualDataModel {
            id: displayVisualDataModel
            delegate: displayDelegate
            model: myModel
            groups: [
                VisualDataGroup {
                    includeByDefault: false
                    name: "displayField"
                }
            ]
            filterOnGroup: "displayField"
            Component.onCompleted: {
                var rowCount = myModel.count;
                items.remove(0,rowCount);
                for( var i = 0;i < rowCount;i++ ) {
                    var entry = myModel.get(i);
                    if(entry.role_display !== undefined) {
                        items.insert(entry, "displayField");
                    }
                }
            }
        }
        Component{
            id: displayDelegate

            Rectangle {
                anchors.left: parent.left
                anchors.right: parent.right
                height: root.rowHeight
                color: "green"
                border.color: "black"

                Text {
                    text: role_display
                    anchors.centerIn: parent
                }
            }
        }
        ListView {
            id: displayListView
            anchors.left: parent.left
            anchors.right: parent.right
            height: root.rowHeight * 4
            model: displayVisualDataModel
        }
    }
}
What about C++?
Well this is all fine and dandy however what if I'm using a C++ model instead of the ListModel QML component?
That is a good question; The issue I ran into was that the ListModel and QAbstractItemModel interfaces are quite different, the QAbstractItemModel does not have a get() method like the ListModel does and we're using that in our Component.OnComplete() handler. It took a while to figure out what the ListModel::get() method was returning but with the help of some colleges we found out that its returning a QVariantMap where the key is the QByteArray value which is defined in the QAbstractItemModel::roleNames() method.
So lets add a C++ view model to our sample project and use it instead of the ListModel we've been using to date. Since the above is a Qt Quick UI project we'll need to create a new Qt Quick Application (*.pro) project, copy the QML script VisualDataGroup_Smaple1.qml over to it and add a new C++ class called MyViewModel. Have the MyViewModel class extend the QStandardItemModel which is a template Qt Model from Qt's Model View Architecture.
This class will contain our data and we can assign different attributes to the data in the collection via Roles ( think of roles as attributes ). This is the same as we did in the ListModel except in C++ we define them as an enum and use them in the setData() and data() methods when entering and retrieving data into/from the collection. In order for the QML scripts to be able to reference these attributes without having to explicitly invoke a method call we create a QHash that maps enum values to strings where the C++ uses the enum values and the QML scripts use the string values; this is done within the virtual method QAbstractItemModel::roleNames.
I'll go over all this in more detail in a future post dedicated to creating C++ models for Qt's Model View Architecture but for now lets gloss over it and get back to this tutorial on the VisualDataGroup.
So that we don't have to change our QML script to much we need to make the interface of our MyViewModel (which extends QStandardItemModel which is a concrete version of the QAbstractItemModel) match that of the ListModel that we were using to date. To do this we need to add a count property (via the Q_PROPERTY macro) and a get() method (via the Q_INVOKABLE macro).
The count property is pretty straight forward if you've read my previous tutorial Qt Quick 102: Introducing C++ to QML, we simply declare the property via the Q_PROPERTY macro so the QML scripts know about it and the slot that gets invoked when the QML scripts access the property simply ask the model how many items are in its collection.
In the MyViewModel header we declare the count property like so:
Q_PROPERTY( int count READ getRowCount() NOTIFY rowCountChanged() )
- count: is the name of the property which matches the property of the ListModel class so that the QML does not have to change.
- getRowCount(): is a slot which asks the model its row count ( this->rowCount(); ) which is just the base implementation of QStandardItemModel.
- rowCountChanged(): is a signal that MyViewModel emits whenever it adds or removes data form its collection ( this is a signal we have to emit manually the QStandardItemModel doesn't know about it; see the MyViewModel::initialize() method)
The real trick for me was the get() method; not that its a hard method to implement, far from it, but that it was hard to figure out what the architecture was looking for.
As part of the QStandardItemModel (or rather the QAbstractItemModel) there is a virtual method called roleNames() which the glue between the View and the ViewModel use to map the references used by the view to values the C++ model can use (string to enum). If we define custom attributes (Roles) that we want to use in our business logic and in the view we need to re-implement this method to include them so that the glue between the View and the ViewModel knows how to map the references.
QHash<int,QByteArray> MyViewModel::roleNames() const
{
    QHash<int, QByteArray> roles;
    roles[MyViewModel_Roles::MyViewModel_Roles_Display] = "role_display";
    roles[MyViewModel_Roles::MyViewModel_Roles_Details] = "role_details";
    roles[MyViewModel_Roles::MyViewModel_Roles_KeyId] = "role_keyid";
    roles[MyViewModel_Roles::MyViewModel_Roles_Value] = "role_value";

    return roles;
}
The MyViewModel::get() method uses these so that it can return an object to the View that uses the same mapping. Again this it to match what the ListModel was doing so that we don't have to change our QML scripts very much.
QVariantMap MyViewModel::get( int rowNumber ) const
{
    QVariantMap map;
    QHash<:int,QByteArray> roleName = roleNames();
    foreach (int i, roleName.keys())
    {
        // For each attribute (role) get its value and insert it into the map
        // where the map's key is the attributes string reference

        // The data() method returns the value for the requested attribute
        // where i is the attributes enum value.
        // The index() method returns a QModelIndex which is a further
        // abstraction layer (will talk about that in a later post)
        map[roleName.value(i)] = data( index( rowNumber,0 ), i );
    }
    return map;
}
Here we are returning a QVariantMap object back to the view; the keys in this map match the keys the QML script uses when displaying the collection of data from the view model when put inside a view such as a ListView. This way the return from this method can be used like so returnObject.role_display.
On the QML side of things we only have to change the Component.onCompleted() handlers a little bit in order to point it at the MyViewModel (C++) vs. the ListModel (QML).
Component.onCompleted: {
    var rowCount = MyModel.count;
    items.remove(0,rowCount);
    for( var i = 0;i < rowCount;i++ )
    {
        var entry = MyModel.get(i);
        if(entry.role_display !== undefined){
            items.insert(entry, "displayField");
        }
    }
}
Notice that all we needed to do here is change the keyword myModel to MyModel where myModel was the id of the ListModel and MyModel is a reference to a root context which we set in the main.cpp file.
MyViewModel* viewModel = new MyViewModel();
viewModel->initialize();

QQmlApplicationEngine engine;

//"MyModel" is a string reference that can be used in QML to look up this object.
engine.rootContext()->setContextProperty("MyModel", viewModel );
engine.load(QUrl(QStringLiteral("qrc:///main.qml")));
When this version of the sample app is executed you'll get the exact same behaviour; Sample 1 and Sample 2 look and behave exactly the same the only difference is that one is using a ListModel (QML) and another is using MyViewModel (C++).
Ok so that is how you use the VisualDataGroup in order to allow a View to only show a sub set of the data contained within the root Data Model.
You can download both samples which illustrates the use of a VisualDataGroup here:
Sample 1: All QML
Sample 2: C++ ViewModel
Sample 3: All QML, One ListView, One VisualDataModel, Multiple VisualDataGroups
Thank you I hope you have enjoyed and found this tutorial helpful. Feel free to leave any comments or questions you might have below and I’ll try to answer them as time permits.
Until next time think imaginatively and design creatively