QTest 101: Writing UnitTests for my Qt Application
By: Brad
In this tutorial I’ll walk you through the basics of using QTest to write Unit Tests for your Qt application.
First we need a project to unit test; download the QtQuick Sample Application.
What do we Unit Test?
First things first what in the QtQuick Sample Application do we want to unit test? We want to unit test our code; there is no point in unit testing framework code, lets issue a little trust to the designers of the framework code and take it on good faith that they unit tested their code. We don’t want to unit test UI code because well emulating mouse clicks and keyboard entries to exercise GUI elements doesn’t isolate the change (its more of an integration or consumer test then a unit test). So what does that leave us with? Business logic.
How do I Setup The Unit Tests
A unit test is just a method that executes the code under test (CUT) and verifies the expected result. To actual run the unit test something needs to call that method; this something is generally another executable typically referred to as a Test Runner or Test Harness application. These Test Runner applications are just console executable that require no user input to run through all the unit tests. They generally print out formatted text to the console to let the user know how many test passed and which ones failed and can generate the same information as an XML file that can be used for reporting, build systems like Jenkins can generate graphs and formatted reports based off of the XML data.
How do I add a Test Runner Application Project and Link it with my Existing Project?
In Visual Studio speak we want to create a solution and include both our production project and our Test Runner project to it. Qt Creator does not have any notion of solution like Visual Studio does however Qt Creator does have a project template that lets you create hierarchy.
Creating a Project Hierarchy
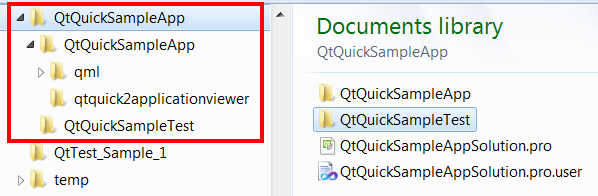
First lets move some files around. In your Windows Exploerer go to where you downloaded and extracted the QtQuick Sample Application, the directory structure should look something like this:
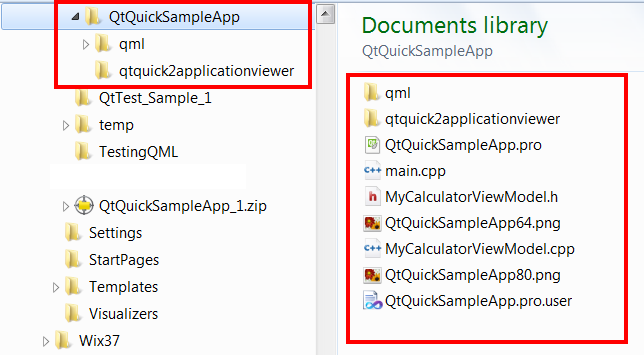
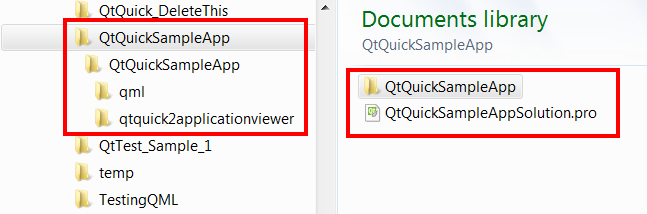
Now in the root directory create a new folder and call it QtQuickSampleApp and copy everything into it (you should now have QtQuickSampleApp\QtQuickSampleApp\QtQuickSampleApp.pro). Under the first QtQuickSampleApp folder create a new plain text file called QtQuickSampleAppSolution.pro. Your directory structure should now look like this:
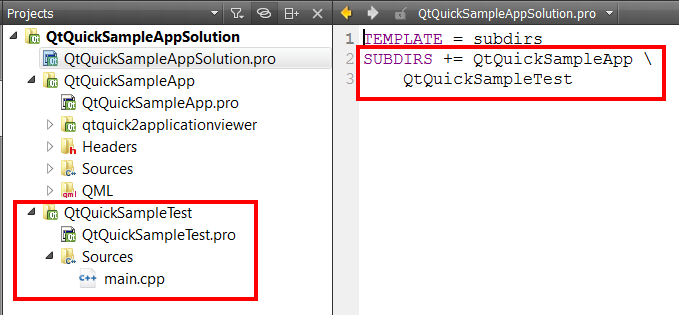
Open QtQuickSampleAppSolution.pro in your favorite text editor (for me its Notepad++) and paste in the following.
TEMPLATE = subdirs
SUBDIRS += QtQuickSampleApp
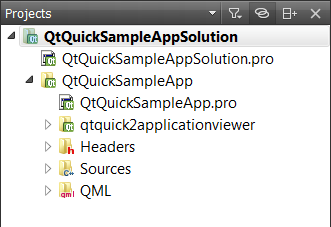
Here we are telling qmake to use a project template called subdirs which is the template that allows us to create essentially the same thing as a Visual Studio solution. The second line is specifying what projects to include in this solution. Now if you save QtQuickSampleApplicationSolution.pro and open it in QtCreator you’ll see you now have two projects one nested under the other.
Building and running the hierarchical project will render the same Calculator sample application that we’ve grown so fond of over the last few posts.
Creating a Test Runner Application
Now that we have a hierarchical project structure we can start adding additional projects to our solution. Right-click on the root project and select New Subproject… this will bring up the New Subproject wizard. We’re going to create our Test Runner/Test Harness application which is simply a console application so I’m going to pick Qt Console Application and call it QtQuickSampleTest.

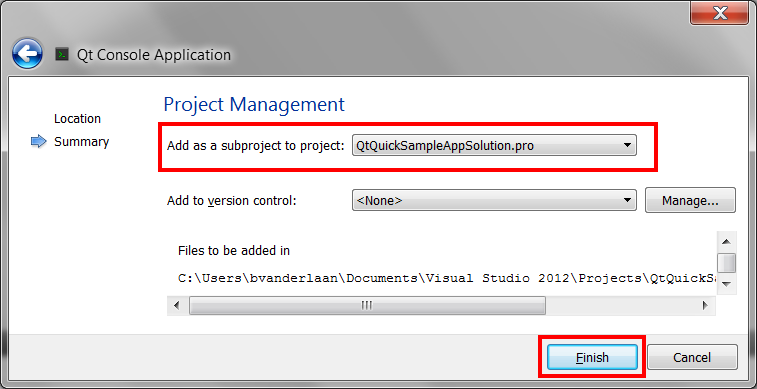
As your going through the new project wizard you may notice on the summary page at the end a new drop down called Add as a subproject to project: we want to make sure the drop down has selected the root project. This will automatically append the SUBDIRS qMake variable in the QtQuickSampleApplicationSolution.pro file to include the QtQuickSampleTest project.
Your directory structure and project heiarchy should look like this:
Writing Our Test Runner Application
We could start writing some custom code to loop through all our test methods, print out messages explaining the relative success or failure of the tests, and to compile an XML output file but why re-invent the wheel when so many others have already written complete frameworks which do all that and more. I’ll publish another article on the different Unit Testing Frameworks that exist but for the sake of this tutorial we’re going to use QTest which is a Unit Test Framework that comes with Qt (so the good news is that you already have it installed since by this point you must have already installed the Qt Framework).
Commercial break...
Configuring our Test Runner Application’s Project Settings
Open the QtQuickSampleTest.pro file you should see the following which is the default boiler plate stuff for a Console application.
QT       += core
QT       -= gui
TARGET = QtQuickSampleTest
CONFIG   += console
CONFIG   -= app_bundle
TEMPLATE = app
SOURCES += main.cpp
As we are going to use QTest we need to add the QTestLib module to the project via the QT qMake variable and add testcase to the configuration.
QT       += core testlib
QT       -= gui
TARGET = QtQuickSampleTest
CONFIG   += console
CONFIG   -= app_bundle
CONFIG   += testcase
TEMPLATE = app
SOURCES += main.cpp
Creating a Test Class
All of our Unit Test methods that we write need to go into a class, I’ll refer to this class as the Test Class; our main.cpp will call all the unit test methods the Test Class exposes. To create the Test Class right-click on the QtQuickSampleTest project folder and select Add New… to bring up the New File Wizard. Add a new C++ Class called QtQuickSampleApplicationTest that extends QObject. That is all you need to do for now, we’ll add tests later on.
Configuring our Test Runner Applications Main
Open the main.cpp, by default it has a boiler plate main() method. We need to modify it so that it will run our Test Class, luckily QTest has a MACRO that will do that for us. Delete everything that is currently in your main.cpp and replace it with the following:
#include <QtTest/QTest>
#include "QtQuickSampleApplicationTest.h"
QTEST_APPLESS_MAIN( QtQuickSampleApplicationTest )
There are three MACROs you can use QTEST_MAIN, QTEST_GUILESS_MAIN, and QTEST_APPLESS_MAIN.
- QTEST_MAIN – Implements a main() function that instantiates a QApplication object and the Test Class, then executes all tests in the order they were defined.
- QTEST_GUILESS_MAIN – The same as QTEST_MAIN but instead of instantiating a QApplication object it instantiates a QCoreApplication object.
- QTEST_APPLESS_MAIN – The same as QTEST_MAIN but does not instantiates a QApplication object, just the Test Class.
In our case the QTEST_APPLESS_MAIN will work as we are writing unit tests not integration tests, that is we are just testing business logic here.
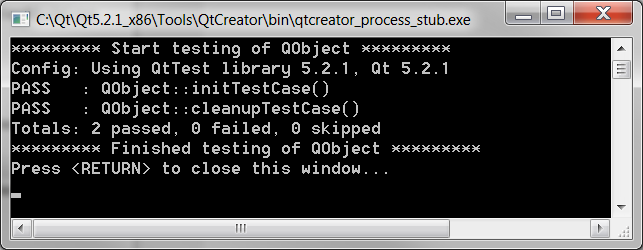
At this point you can build and run the QtQuickSampleTest project (you might have to run qmake first to update the QtQuickSampleSolution.pro file) and you’ll get a console output showing two passed tests. These are built in setup and tare down methods that get run at the beginning and end of your test suite (before and after executing all your unit tests). We don’t have any actual unit tests yet but we are ready to start adding them…. or are we?
How do I get Access to My Business Logic from My Test Runner?
You might have noticed now that all our business logic is in our production application how is our Test Runner suppose to access them? Well you hit on the first thing one must come to adopt and writing Unit Tests and that is that the code under test needs to be share-able between the production assembly and the Test Runner assembly; meaning that it can’t be solely located within the production assembly (assuming the production assembly isn’t a DLL or static lib which in our case it isn’t). What we have to do at this point is to move our existing business logic out of the QtQuickSampleApp.exe and into a library file that both QtQuickSampleApp.exe and QtQuickSampleTest.exe can share.
We can use either a Static or Dynamic lib for this, I personally don’t care one way or the other; I don’t have strong feelings towards one type of lib over another but for this case since QtQuickSampleApp.exe was previously released as a single EXE I’d like to keep the footprint the same so I’ll go with a Static Lib.
Adding a Business Logic Library Project
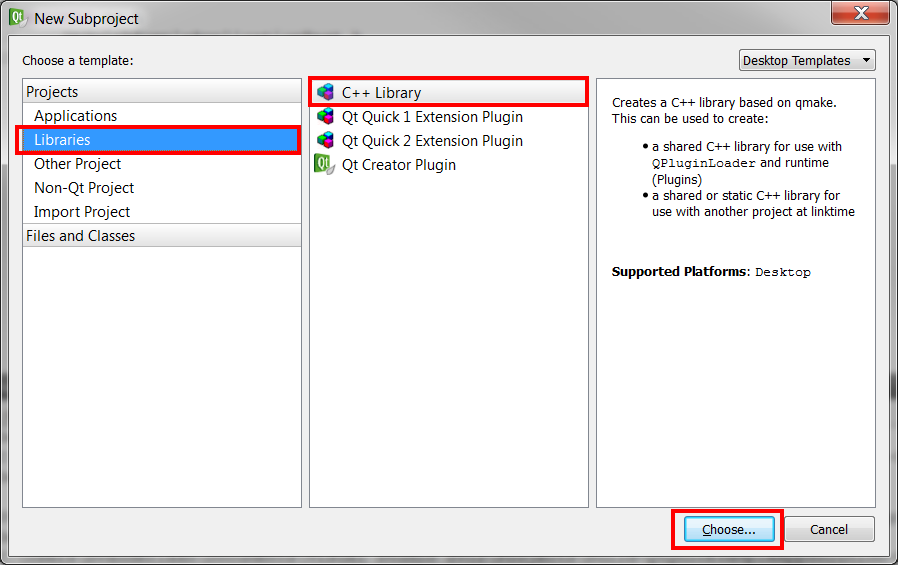
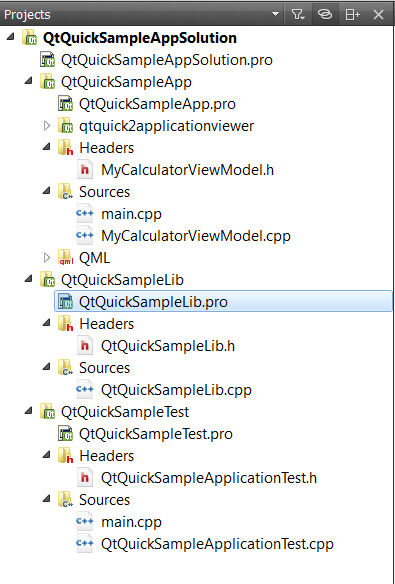
Right-click on the QtQuickSampleAppSolution and select New Subproject… to open the New Subproject wizard. This time select Libraries and C++ Library.
Make sure the Type drop down is set to Statically Linked Library and call it QtQuickSampleLib. Only the QtCore module is needed for this library. Your Solution should now be looking something like this:
Moving the Existing Business Logic to the Lib
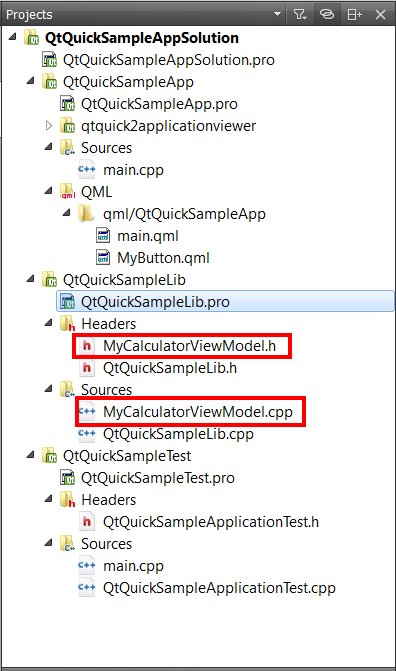
In the Windows Explorer go to the QtQuickSampleApp folder and do a cut and paste of the MyCalculatorViewModel.h and MyCalculatorViewModel.cpp files from the QtQuickSampleApp\QtQuickSampleApp folder to the QtQuickSampleApp\QtQuickSampleLib folder.
Now back in QtCreator open QtQuickSmapleApp.pro. On line 10 notice the SOURCES qMake variable, remove the reference to MyCalculatorViewModel.cpp. On line 20 notice the HEADERS qMake variable, since we no longer have any headers in the QtQUickSampleApp project you can delete this qMake variable all together.
Now open QtQuickSampleLib.pro and add MyCalculatorViewModel.cpp to its SOURCES qMake variable and MyCalculatorViewModel.hpp to its HEADERS qMake variable.
Once you save these changes wait for QtCreator to re-index the project (done automatically, should only take a second or two to kick off) then expand the Headers and Sources filters under the QtQuickSampleLib project and you notice that the MyCalculatorViewModel class is now part of that project.
Updating both my Production and Test Runner applications to use the Shared Library
First thing we need to do is make sure our build order is setup to ensure that the library assembly is built first and that the applications get re-compiled if there is a change in the library.
Open QtQuickSmapleAppSolution.pro and add the following to specify that the two application projects depend on the library project.
TEMPLATE = subdirs
SUBDIRS += QtQuickSampleApp \
    QtQuickSampleTest \
    QtQuickSampleLib

QtQuickSampleApp.depends = QtQuickSampleLib
QtQuickSampleTest.depends = QtQuickSampleLib
Now we need to let the two application projects know where to look for the MyCalculatorViewModel header file when including and where the static library assembly can be found when linking. Open QtQuickSampleApp.pro; add the INCLUDEPATH qMake variable with a relative path to the QtQuickSampleLib folder and using the LIBS qMake variable tell it what library file to link to. Because the library file can be either under the releases or debug sub folder we’re going to use the CONFIG qMake variable to add some logic to the settings file.
# Add more folders to ship with the application, here
folder_01.source = qml/QtQuickSampleApp
folder_01.target = qml
DEPLOYMENTFOLDERS = folder_01

# Additional import path used to resolve QML modules in Creator's code model
QML_IMPORT_PATH =

# The .cpp file which was generated for your project. Feel free to hack it.
SOURCES += main.cpp

# Installation path
# target.path =

# Please do not modify the following two lines. Required for deployment.
include(qtquick2applicationviewer/qtquick2applicationviewer.pri)
qtcAddDeployment()

# Adds the QtQuickSampleLib project path to the header file include lookup path
INCLUDEPATH += $$PWD/../QtQuickSampleLib

# Adds the QtQuickSampleLib.lib to the linker
win32:CONFIG(release, debug|release): LIBS += -L$$OUT_PWD/../QtQuickSampleLib/release/ -lQtQuickSampleLib
else:win32:CONFIG(debug, debug|release): LIBS += -L$$OUT_PWD/../QtQuickSampleLib/debug/ -lQtQuickSampleLib
Do the same for QtQuickSampleTest then right-click on the QtQuickSampleAppSolution root folder and select Run qmake to re-generate the make file then select Build -> Build All to recompile the entire solution. You shouldn’t get any errors and if you run QtQuickSampleApp you’ll be looking at your favorite Calculator again.
Commercial break...
Writing Some Unit Tests
We’re now ready to start creating some Unit Tests, Open QtQuickSampleApplicationTest.h and lets add some Test Methods to our Test Class.
The code we want to test is that which is in our business logic class MyCalculatorViewModel; lets bang off the first method of that class, getUserInput() and get it under test.
Lets first test that if we call getUserInput() right after initialization of the MyCalculatorViewModel class that we get the expected default value of zero. To do this we need to add a method to our Test Class which will execute this test.
#ifndef QTQUICKSAMPLEAPPLICATIONTEST_H
#define QTQUICKSAMPLEAPPLICATIONTEST_H

#include <QObject>

class QtQuickSampleApplicationTest : public QObject
{
    Q_OBJECT
public:
    explicit QtQuickSampleApplicationTest( QObject *parent = 0);

private slots:
    void myCalculatorViewModelUserInputDefaultValuesTest();
};

#endif // QTQUICKSAMPLEAPPLICATIONTEST_H
The implementation of the myCalculatorViewModelUserInputDefaultValuesTest() Test Method is pretty straight forward; we instantiate the Code Under Test (CUT), perform any test setup and assertions to ensure that the initial state of the test environment is what we expect it to be going into the test, then execute the CUT and verify its results.
In this test since we’re just testing for the default value there isn’t any setup required, just instantiate an instance of the MyCalculatorViewModel class. We then use the build in MACRO provided by QTest called QVERIFY2 to verify that the actual value we get from getUserInput() is what we expect it to be. If getUserInput() does not return the expected value the test will be marked as failed.
#include "QtQuickSampleApplicationTest.h" #include#include "MyCalculatorViewModel.h" ///////////////////////////////////////////////////////////////////////////// QtQuickSampleApplicationTest::QtQuickSampleApplicationTest(QObject *parent) : QObject(parent) { } ///////////////////////////////////////////////////////////////////////////// void QtQuickSampleApplicationTest::myCalculatorViewModelUserInputDefaultValuesTest() { // Setup the test MyCalculatorViewModel model; // Test QVERIFY2( model.getUserInput() == 0, "Expect the user input to be zero by default"); }
If you build and run the QtQuickSmapleTest project now you’ll see 3 passed tests, two being the built in setup/tare down methods and one being our first unit test myCalculatorViewModelUserInputDefaultValuesTest().
If getUserInput() didn’t return zero for some reason the test would be marked as failed and the output would look like this:
Notice because we used QVERIFY2 our message is being displayed stating that this test failed because we were expecting the method to return zero. We could make our message more easier to understand by having it state clearly what we got and what was expected by adding those values to the message. Lets add another Unit Test which verifies that we can get non-default values from getUserInput() and make the error message more human readable.
///////////////////////////////////////////////////////////////////////////////////////////////////////////////////////
void QtQuickSampleApplicationTest::myCalculatorViewModelUserInputTest()
{
    // Setup the test
    MyCalculatorViewModel model;

    QCOMPARE( model.getUserInput(), 0 ); //Expect the user input to be zero by default
    int expect( 100 );
    model.setUserInput( expect );

    // Test - we're actually testing both the set and get method here, not as isolated as I would like but ok for what it is.
    int actual = model.getUserInput();

    QVERIFY2( actual == expect,
              QString("Expect the user input to be [%1] but actually got [%2] instead.").arg(expect).arg(actual).toStdString().c_str());
}
In this test we again instantiate the MyCalculatorViewModel class because each test is independent from every other test in the suite but this time we use QCOMPARE to assert that the default value is 0; we do this because we’re not testing the default value here but we want to make sure that getUserInput() isn’t already returning the expected values which would invalidate the test to make sure we can set the user input value (if its already 100 before I set it to 100 how can I prove that my set method really worked?). If the QCOMPARE statement fails the test is aborted; however, if it evaluate to true then I complete my test setup by setting the user input value to something other then the default value (in this case I set it to the integer value of 100).
In the actual test phase of this Test Method notice that this time I’m storing the return value of getUserInput() into a variable, I’m doing this so that I can use the value in the QVERIFY2 statement for evaluation and also in the error message. By doing it this way I’m also making the code more readable because its clearly stating which value is expected and which value is the actual obtained value.
If you run the Test Runner now and the myCalculatorViewModelUserInputTest() fails you’ll get the following output.
Notice that now the error message is clearly stating that it expected the value of 100 but got a value of 0 which should indicate to us that the setUserInput() method failed. Fixing the error in the offending method and running the suite again and you’ll get a happy and successful test run.
And there you have it, you can now start adding all the Unit Tests required to get the MyCalculatorViewModel class under test and you can follow the same pattern as described in this tutorial to add additional business logic classes to the calculator application and get those classes similarly under test.
Thank you I hope you have enjoyed and found this tutorial helpful. Feel free to leave any comments or questions you might have below and I’ll try to answer them as time permits.
Until next time think imaginatively and design creatively
I came here for a search on “QTest Jenkins” – just when I thought “here’s what I’m looking for”, the article ended 🙂 Could you please elaborate how you use this project in Jenkins?
Not a problem, I’ve just uploaded a new post which should elaborate on how to report QTest test results within Jenkins. You can find it here: How the Heck do you Report QTest results in Jenkins?
Thanks for the article, but I was wondering what is the advantage of your method of incorporating unit-tests over this method: http://xilexio.org/?p=125
Your method is more complicated and requires more work (separating business logic, creating static/dynamic libs, etc.) but I’m not sure what is the benefit
Hi spagheticat, I read the article you linked to and it is a sound way of setting up a project with unit tests however I feel that its more complicated then the one I described above unless the project in question is small and short lived.
With my approach yes you need to separate your UI logic from your business logic but that is generally viewed as a good thing. The separation gives me more options as I can now share code between projects and create completely different UIs which utilize the same business logic code. For example I could create a UI project for a desktop application and another one for an Android application (since Qt can be used for both platforms) then have both UI projects link against the same business logic without any duplication. This in its self is probably a good topic for another post; I’ll see about writing something up on why separating business logic is a good thing.
Secondly I find that the approach in the articular requires more manual work and complicates the core application with if/else statements. When I add a new test suite in my applications I right click on the unit test project in Qt Creator and click Add New… then follow the wizard for adding a new C++ Class. This wizard creates two new files, the CPP and HPP files, with appropriate snippets and adds the class to my *.pro file so that they get automatically added to my make file. With the linked to article’s approach you would have to go in and manually move the test suite files into the appropriate condition; that is move them within the test scope to ensure they are only built and included in the test configuration. Add the fact that there will also be a condition to select which main to run, the test’s main or the actual applications main, it to me looks like more effort and is something that would likely be missed often on larger projects.
Also as the author of the linked to article points out the new test configuration is stored in the *.user.pro file so each team member has to remember to create their own test configuration if they want to run the unit tests. This might become more problematical when you think about the fact that the build server also needs to be able to run the unit tests and this would require some manual setup on the actual build server to ensure it has a test configuration. If your build server setup works with multiple nodes this might become rather error prone.
Lastly I would find it unpleasant to have to continually switch between my Debug and Test configurations while working since I run my unit tests often. I’d feel that unless you were really dedicated to unit testing you might start running them less often and might even end up forgetting to run them due to the inconvenience. Unit testing is an absolutely fantastic and powerful tool but tools which are hard to use or not as convenient as we would like don’t get used no matter how helpful they really are.
So the approach in the linked to article is not wrong and might work well on small short lived projects but on larger projects worked on by multiple developers over the coarse of years I feel that it would be to inconvenient and error prone and the approach I outlined above would be the better fit. There are no right or wrong ways of doing things in software development all options have trade offs and some approaches fit a particular problem better then others. I’ll leave it up to you to choose which solution best fits your needs. I hope this answered your question. Until next time think imaginatively and design creatively
Great tutorial
For unix, just add this
unix {
LIBS += -L$$OUT_PWD/../QtQuickSampleLib -lQtQuickSampleLib
}