QtQuick 102: Introducing C++ to QML
By: Brad
In my previous post QtQuick 101: A Tutorial for Beginners I introduced you to the QtQuick framework and showed you how to make your first QML project. What was lacking in the last tutorial was C++; I had showed you how to make a QtQuick application using entirely QML.
In this post I will show you how to make a QtQuick application that uses both C++ and QML.
In the end of the last tutorial (Writing your First QtQuick Program) we created a QMLProject which contained the main QML script and a second QML script which defined a custom button control. We did this in QtCreator by selecting File -> New File or Project… Then choose the Qt Quick UI project template. This time we’re going to choose the Qt Quick Application template.
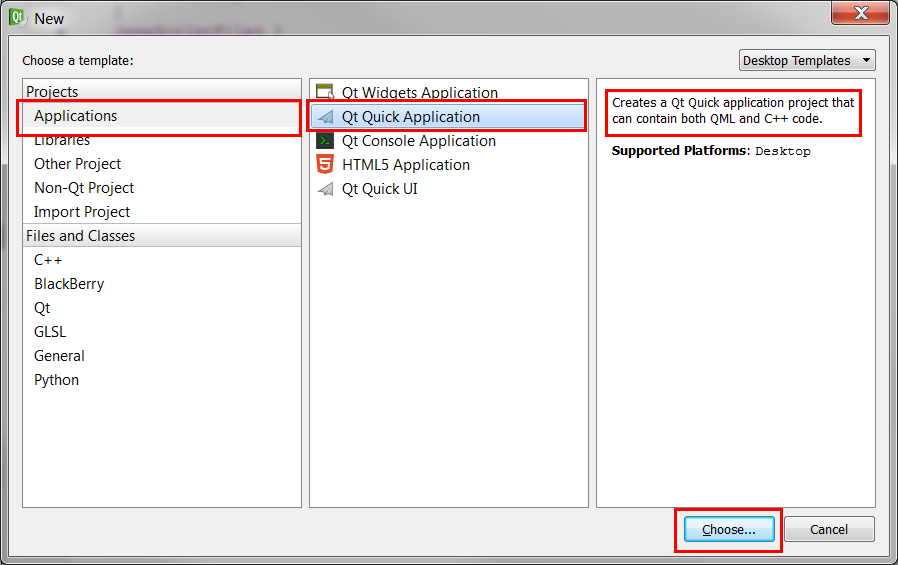
Following the same steps as outlined in the previous tutorial (except this time I named the project QtQuickSampleApp you’ll end up with a new project that includes both QML and C++ source files.
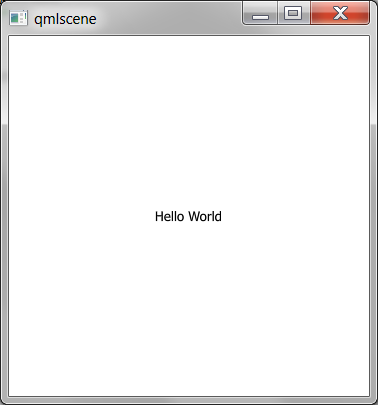
If you compile this project straight away you’ll get a simple window with the string “Hello World” displayed in it (same default project as you saw in the QML project).
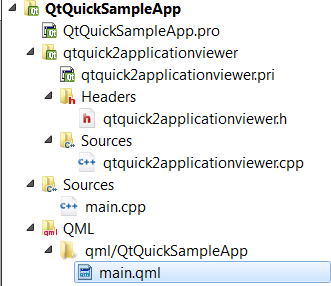
Lets take a look at the the files in our new project shall we.
QtQuickSampleApp.pro
In the QML only project you had a *.qmlproject file but since this project has both QML and C++ this project template uses a *.pro file to define how this project is to be built. If you double click the file you’ll open it in your editor.
# Add more folders to ship with the application, here
folder_01.source = qml/QtQuickSampleApp
folder_01.target = qml
DEPLOYMENTFOLDERS = folder_01

# Additional import path used to resolve QML modules in Creator's code model
QML_IMPORT_PATH =

# The .cpp file which was generated for your project. Feel free to hack it.
SOURCES += main.cpp

# Installation path
# target.path =

# Please do not modify the following two lines. Required for deployment.
include(qtquick2applicationviewer/qtquick2applicationviewer.pri)
qtcAddDeployment()
Lines 2 and 3 are defining a folder that the project should know about. Line 2 is stating that when looking for source files look under the qml/QtQuickSampleApp folder; that is because if you look on your disk your main QML file is not in the project root but is under that sub folder. This is how the project knows where to find the QML files. Line two is specifying that when I want to copy this folder I should copy it from the the top level (i.e. qml) vs. the sub-sub-folder (QtQuickSampleApp). Line 4 is what tells the project to copy that folder when the project is built.
Line 10 is telling your project where to find your C++ source files (i.e. *.cpp). If you have more then one CPP file you can add it to the project file in two ways:
SOURCES += main.cpp
SOURCES += newSource.cpp
OR
SOURCES += main.cpp \
           newSource.cpp
By default you don’t have any header files but if you did you would use the HEADERS macro in the same way
HEADERS += myHeader.hpp
HEADERS += otherHeader.h
OR
HEADERS += myHeader.hpp \
           otherHeader.h
The last lines in your *.pro file are boiler plate and needed. The reason is that the QtQuick framework takes the QML script and generates an OpenGL scene graph; your C++ requires a way to render and view that graph. The QtQuick2ApplicationViewer is the engine that allows you to embed the scene graph into your C++ project.
You’ll find that boiler plate class under the qtquick2applicationviewer sub folder and there isn’t really any need to fiddle around with it; just use it as a black box.
The next file in our project to look at is the main.cpp file, which you’ll find under the Sources filter in your project tree.
main.cpp
#include <QtGui/QGuiApplication>
#include "qtquick2applicationviewer.h"

int main(int argc, char *argv[])
{
    QGuiApplication app(argc, argv);

    QtQuick2ApplicationViewer viewer;
    viewer.setMainQmlFile(QStringLiteral("qml/QtQuickSampleApp/main.qml"));
    viewer.showExpanded();

    return app.exec();
}
Notice that its just a normal C++ main method and just like in Qt we create a QGuiApplication() and call its exec() method to generate our message loop. What is different is that we instantiate an instance of that QtQuick2ApplicationViewer class I mentioned before and tell it where to find the main QML script file (see line 9).
This is the entry into our application. The viewer object will parse and render the described OpenGL scene graph from the main.qml script and show it inside the traditional QtGuiApplication window (see line 10).
main.qml
The main.qml file is exactly the same as the default QML script file generated when you pick the Qt Quick UI project template as we did in the start of the previous tutorial.
import QtQuick 2.0

Rectangle {
    width: 360
    height: 360
    Text {
        text: qsTr("Hello World")
        anchors.centerIn: parent
    }
    MouseArea {
        anchors.fill: parent
        onClicked: {
            Qt.quit();
        }
    }
}
So that is the default QtQuick project that is using both C++ and QML to generate an executable that one can deploy to other machines.
Now lets see if we can migrate our sample Calculator QML application into this project.
If you haven’t already download the QMLSample App located here.
Firstly to add our custom button control to this new project just copy the MyButton.qml file into the qml/QtQuickSampleApp directory (the same directory that holds the main.qml file). Because our QtQuickSampleApp.pro file is aware to look for files in that folder it will automatically show up under the QML filter in QtCreator.
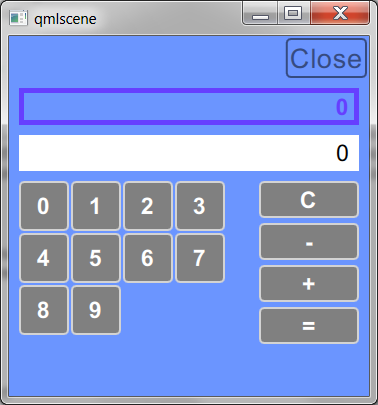
Next open the QMLSampleApp.qml file, copy all the QML script there and past it into our new main.qml file replacing all the existing QML which is just the Hello World sample. Build and run (keyboard short cut is Ctrl + R) the QtQuickSampleApp project and you’ll see the familiar Calculator application we made before.
Of course at this point were really not using any C++ so for no other reason but to show you how lets start moving our JavaScript code into our C++.
In the last tutorial we didn’t really use the model/view architecture that we get with Qt/QtQuick but that is really key when it comes to using C++ with QML; however, it does not mean we have to use C++ in order to use the model/view architecture. That is actually a nice thing because personally I like to ‘mock’ everything out in QML since its fast and easy to do before implementing any C++. This allows me to finish my UI without getting bogged down with business logic implementation. This is actually inline with Microsofts intent when the MVVM pattern and their separation of tools (i.e. Microsoft Blend for UI/UX – Visual Studio for programmers).
To begin modifying our UI code (i.e. QML) in preparation for a C++ backend model lets add a temporary QML model to our main.qml file and move the javascript functions into it since eventually these functions will be replaced with C++ methods that will exist within our C++ model. Lets also move the property we were storing the current operation in which was called operation into the model.
ListModel {
    id: myCalculatorModel

    property int operation: operationTypes.none

    function add(A, B) {
        return A + B;
    }

    function subtract(A, B) {
        return A - B;
    }
}
Because we moved these functions out of the Row element buttonRow we need to change where we call these functions and set the operation property from buttonRow.add() to myCalculatorModel.add().
So one of the things we did last time was manipulate the values of the MyResult and UserInput text boxes directly. that is when we wanted to clear the text box we referenced it by id and manipulated its text property directly (userInput.text = “”). That’s pretty procedural and is something you’d expect to see in a Forms and Control architecture. In a Declarative architecture UI elements shouldn’t be worked on directly but rather bind to properties that hold the data to display. Its these properties that should be acted on by the business logic; the loose binding between properties in the business logic and the UI layer is what allows the UI to update implicitly vs. explicitly. That is the business logic only has to concern it self with doing business logic things as long as the data that needs to be displayed are exposed as bind-able properties the UI will take care of updating it self.
To achieve this lets add two new properties to the myCalculator model that will hold the values we want to have displayed in the myResults and userInput text boxes.
ListModel {
    id: myCalculatorModel

    property int operation: operationTypes.none
    property int userInput: 0
    property int myResult: 0

    function add(A, B) {
        return A + B;
    }

    function subtract(A, B) {
        return A - B;
    }
}
Now lest bind the text property of the myResult and userInput text boxes to these two new properties so that the displayed text in these text boxes will automatically or implicitly update when we modify the values stored in these properties.
Text {
    id: myResult
    anchors.right: parent.right
    anchors.rightMargin: 10
    anchors.verticalCenter: parent.verticalCenter
    color: "#663FFF"
    font.family: "Arial"
    font.pointSize: 14
    font.bold: true
    text: myCalculatorModel.myResult
}

...

Text {
    id: userInput
    anchors.right: parent.right
    anchors.rightMargin: 10
    anchors.verticalCenter: parent.verticalCenter
    color: "black"
    font.family: myResult.font.family
    font.pointSize: myResult.font.pointSize
    text: myCalculatorModel.userInput
}
We then need to modify all the slots in the script to act on the properties instead of the text boxes directly.
delegate: MyButton {
            font: myResult.font
            labelText: index
            labelColour: "white"
            width: 50
            height: 50

            onButtonClicked: {
                // num is the parameter passed into this slot
                // when the signal is emitted,
                // see the signal definition in the MyButton.qml file.
                if ( myCalculatorModel.userInput === 0 ) {
                    myCalculatorModel.userInput = num
                } else {
                    myCalculatorModel.userInput +=  num
                }
            }
        }
Here is the updated main.qml file which has the above modifications.
If you run the application now you’ll see that it behaves exactly the same as it did before but if you look at the addition, subtraction, and equals button slots they look a little strange.
onButtonClicked: {
    var result;

    if ( myCalculatorModel.operation === operationTypes.addition ) {
        result = myCalculatorModel.add(
                             myCalculatorModel.myResult,
                             myCalculatorModel.userInput )
    } else if ( myCalculatorModel.operation === operationTypes.subtraction ) {
        result = myCalculatorModel.subtract(
                                  myCalculatorModel.myResult,
                                  myCalculatorModel.userInput )
    } else {
        result = myCalculatorModel.userInput
    }

    myCalculatorModel.myResult = result
    myCalculatorModel.userInput = 0
    myCalculatorModel.operation = operationTypes.none
}
For example if we look at the equals button slot above we are getting the myResult property value and the userInput property value from the model then passing them into the add or subtract method which also belongs to the model, then lastly we take the result that the model’s method returns to us and feed that back into the myResult property of the model. Its a little strange for the UI to be acting as the middle man between elements of the model. Shouldn’t the model be able to do all this for us?
Lets re-write this slot function to make more sense but this time lets not think of the add/subtract methods as generic methods coming to us from a library that we can us anywhere and more of specific functions provided to the view by the model designed specifically to add the userInput and myResult values together. This model is specifically for this view and is providing the event handlers for elements in the view (i.e. the equals button); you could say that our model is really the model to be used by this view, or in another way the View’s Model or ViewModel.
onButtonClicked: {
    myCalculatorModel.handleEquals()
}
ListModel {
    id: myCalculatorModel

    property int operation: operationTypes.none
    property int userInput: 0
    property int myResult: 0

    function add(A, B) {
        return A + B;
    }

    function subtract(A, B) {
        return A - B;
    }

    function handleEquals() {
        var result;

        if ( myCalculatorModel.operation === operationTypes.addition ) {
            result = add(
                      myCalculatorModel.myResult,
                      myCalculatorModel.userInput )
        } else if ( operation === operationTypes.subtraction ) {
            result = subtract(
                          myCalculatorModel.myResult,
                          myCalculatorModel.userInput )
        } else {
            result = myCalculatorModel.userInput
        }

        myCalculatorModel.myResult = result
        myCalculatorModel.userInput = 0
        myCalculatorModel.operation = operationTypes.none
    }
}
Using the above idea we can drastically reduce the amount of logic that we have in our view and off load that into our viewmodel. This is good for two reasons:
- It simplifies the UI by clearly dividing business logic from UI logic (i.e. all business logic is now in the viewmodel)
- UI’s are generally hard to unit test due to a number of dependencies (like the UI) and automating UI testing is also difficult (there are a number of tools out there to help automate UI testing but I find them fragile. That is they need constant tending to in order to keep them in sync with changes to the UI. I’m not saying it can’t be done just that its not trivial; the tools are generally scripted based and therefore requires a programmer to write the script (its not point and click) and hooks in the UI to allow the tools to identify elements on the UI. I think its a good thing but I’d call them automated integration tests not unit tests, I wouldn’t break the build due to one of these tests failing; I’d leave it as a post build testing exercise for QA.). By separating the business logic we can test it independent of the UI.
Here is the newly modified main.qml file that now has all the business logic off loaded to the model. Running the application again should yield the exact same behaviour.
Lets Get Some C++ Going On In Here
So now we have modified our view (i.e. UI) to use a viewmodel to pull data from and put all the business logic that manipulates that data within the viewmodel instead of having it within the view it self. We’ve mocked out a viewmodel in QML using the ListModel element so we could focus on our view. We could call it a day, there is nothing wrong with using the ListModel element as our viewmodel but this is again a tutorial on how to use C++ with QML so lets now replace our ListModel viewmodel with a C++ viewmodel.
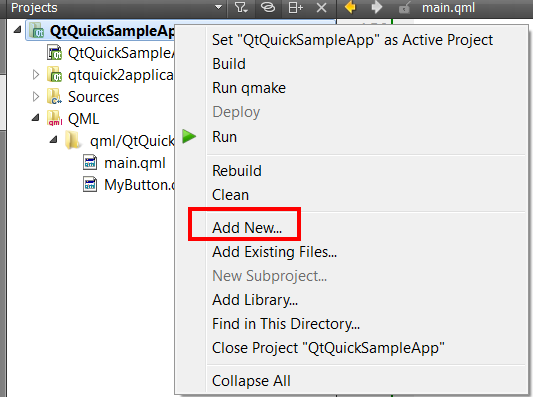
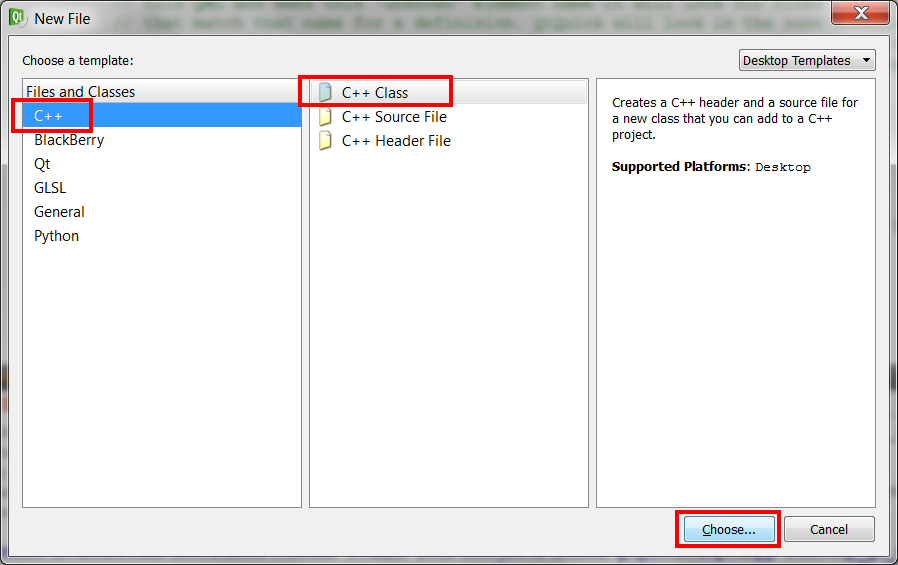
Lets create a new C++ class called MyCalculatorViewModel by right clicking on the project in QtCreator and selecting Add New… then select C++ and C++ Class. Click Choose to move to the C++ Class Wizard and enter MyCalculatorViewModel as the class name. Then click Next and Finish to create the new C++ class.
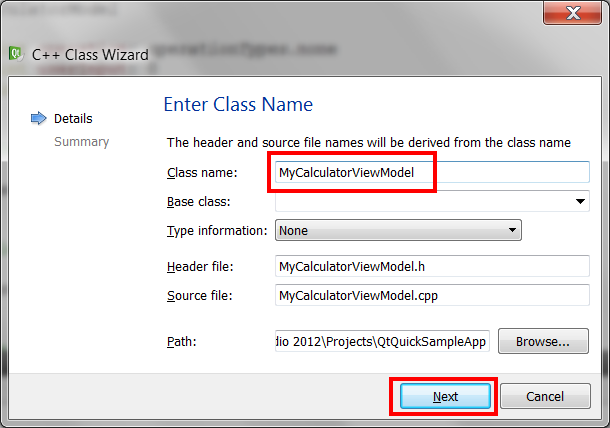
This will generate two files MyCalculatorViewModel.h and MyCalculatorViewModel.cpp.
#ifndef MYCALCULATORVIEWMODEL_H
#define MYCALCULATORVIEWMODEL_H

class MyCalculatorViewModel
{
public:
    MyCalculatorViewModel();
};

#endif // MYCALCULATORVIEWMODEL_H
#include "MyCalculatorViewModel.h"

//////////////////////////////////////////////////////////////////////////////////////
MyCalculatorViewModel::MyCalculatorViewModel()
{
}
Looking at our ListModel in our main.qml file we need to add three properties, two private methods, and 4 public methods to our new C++ model.
QML Properties in C++
To define a property that can be accessed in QML you need to use the Q_PROPERTY macro which is defined in qobjectdefs.h (just include QObject in your header file).
The Q_PROPERTY macro takes a number of optional parameters:
Q_PROPERTY( <type> <name> READ <getter> WRITE <setter> NOTIFY <signal> )
The first parameter <name> is the name of the property. This is the name that you will reference in your QML to access the property; it must begin with a lower case letter (not a number), example myProperty.
The second parameter READ <getter> defines what C++ method to call when someone requests a value from the property. Example READ getMyProperty.
The third parameter WRITE <setter> is optional and is only required if the property is not read-only. It defines which method to call when someone tries to set a value to the property. It needs to take one parameter of the same type as the property. Example: WRITE setMyProperty
Lastly NOTIFY <signal> is an optional parameter which defines a signal that the View will listen to in order to find out if the property’s value has changed and hence the View should update it self with the new value. Each time you change the value of the property you need to emit this signal if you want the View to know about it an implicitly update.
#ifndef MYCALCULATORVIEWMODEL_H
#define MYCALCULATORVIEWMODEL_H

#include <QObject>

class MyCalculatorViewModel : public QObject
{
    Q_OBJECT
    Q_PROPERTY( int userInput READ getUserInput WRITE setUserInput NOTIFY userInputChanged )
    Q_PROPERTY( int myResult READ getMyResult WRITE setMyResult NOTIFY myResultChanged )
    Q_PROPERTY( int operation READ getOperation )

public:
    MyCalculatorViewModel();

    int getUserInput();
    void setUserInput( int userInput );
    int getMyResult();
    void setMyResult( int myResult );
    int getOperation();

signals:

    void userInputChanged();
    void myResultChanged();

private:
    int m_userInput;
    int m_myResult;
    int m_currentOperation;
};

#endif // MYCALCULATORVIEWMODEL_H
#include "MyCalculatorViewModel.h"

//////////////////////////////////////////////////////////////////////////////////////
MyCalculatorViewModel::MyCalculatorViewModel() :
    m_userInput( 0 ),
    m_myResult( 0 )
{
}

//////////////////////////////////////////////////////////////////////////////////////
int MyCalculatorViewModel::getUserInput()
{
    return m_userInput;
}

//////////////////////////////////////////////////////////////////////////////////////
void MyCalculatorViewModel::setUserInput( int userInput )
{
    m_userInput = userInput;
    emit userInputChanged();
}

//////////////////////////////////////////////////////////////////////////////////////
int MyCalculatorViewModel::getMyResult()
{
    return m_myResult;
}

//////////////////////////////////////////////////////////////////////////////////////
void MyCalculatorViewModel::setMyResult( int myResult )
{
    m_myResult = myResult;
    emit myResultChanged();
}

//////////////////////////////////////////////////////////////////////////////////////
int MyCalculatorViewModel::getOperation()
{
    return m_currentOperation;
}
C++ Methods in QML
Adding functions that can be accessed via the QML similarly we need to use another MACRO but this time we just need to prefix our method signature with the Q_INVOKABLE keyword to tell Qt to register this function with the QtQuick engine.
Instantiating Our C++ Class in QML
Once we’ve converted all of our JavaScript functions into C++ Methods how do we get the main.qml to instantiate an instance of the MyCalculatorViewModel class?
Go back to the main.cpp file and add the following two lines of code:
#include <QQmlContext>
and
viewer.rootContext()->setContextProperty(
                   QStringLiteral("myCalculatorViewModel"),
                   new MyCalculatorViewModel());
In the above here we’re setting the root context for this view to be an instance of the MyCalculatorViewModel class and have given it a reference, a name that we can use to reference this instance in the QML script, of myCalculatorViewModel. Now we can go back to our main.qml file and remove the ListModel element and anywhere we are using the ListModel’s id of myCalculatorModel we replace with myCalculatorViewModel we should now be redirecting everything from our QML ViewModel to our C++ ViewModel. Building and running the application now should give you the same working Calculator we’ve had all along.
You can download the complete project here.
Here is the complete QML and C++ files:
import QtQuick 2.0
import QtQuick.Layouts 1.0

Rectangle {
    width: 360
    height: 360
    color: "#6B95FF"

    Rectangle {
        id: exitButton
        anchors.right: parent.right
        anchors.top: parent.top
        anchors.margins: 2
        opacity: 0.5
        border.color: "black"
        border.width: 2
        radius: 5
        width: exitButtonText.implicitWidth + (exitButtonText.anchors.margins * 2)
        height: exitButtonText.implicitHeight + (exitButtonText.anchors.margins*2)
        color:  exitButtonMouseArea.pressed ? Qt.darker(parent.color, 1.5) : "transparent"


        MouseArea {
            id:  exitButtonMouseArea
            anchors.fill: parent
            onClicked: {
                Qt.quit();
            }
        }
        Text {
            id: exitButtonText
            anchors.horizontalCenter: parent.horizontalCenter
            anchors.verticalCenter: parent.verticalCenter
            anchors.margins: 4
            anchors.fill:parent
            font.family: myResult.font.family
            font.pointSize: 16
            text: "Close"
            color: "black"
        }
    }
    Column {
        anchors.left: parent.left
        anchors.right: parent.right
        anchors.top: exitButton.bottom
        anchors.bottom: parent.bottom
        anchors.margins: 10
        spacing: 10

        Rectangle {
            id: myResultRect
            anchors.left: parent.left
            anchors.right: parent.right
            height: myResult.implicitHeight + 10
            border.color: "#663FFF"
            border.width: 5
            color: "transparent"
            clip: true

            Text {
                id: myResult
                anchors.right: parent.right
                anchors.rightMargin: 10
                anchors.verticalCenter: parent.verticalCenter
                color: "#663FFF"
                font.family: "Arial"
                font.pointSize: 14
                font.bold: true
                text: myCalculatorViewModel.myResult
            }
        }
        Rectangle {
            id: userInputRect
            anchors.left: parent.left
            anchors.right: parent.right
            height: userInput.implicitHeight + 10
            color: "white"
            clip: true

            Text {
                id: userInput
                anchors.right: parent.right
                anchors.rightMargin: 10
                anchors.verticalCenter: parent.verticalCenter
                color: "black"
                font.family: myResult.font.family
                font.pointSize: myResult.font.pointSize
                text: myCalculatorViewModel.userInput
            }
        }
        RowLayout {
            id: buttonRow
            anchors.left: parent.left
            anchors.right: parent.right
            height: 100
            spacing: 5

            //enum
            QtObject {
                id: operationTypes
                readonly property int none: 0
                readonly property int addition: 1
                readonly property int subtraction: 2
            }

            GridView {
                Layout.fillWidth: true
                anchors.top: parent.top
                anchors.bottom: parent.bottom
                model: 10
                cellWidth: 52
                cellHeight: 52
                delegate: MyButton {
                            font: myResult.font
                            labelText: index
                            labelColour: "white"
                            width: 50
                            height: 50

                            onButtonClicked: {
                                if ( myCalculatorViewModel.userInput === 0 ) {
                                    myCalculatorViewModel.userInput = num
                                } else {
                                    myCalculatorViewModel.userInput +=  num
                                }
                            }
                        }
            }
            Column {
                width: 100
                spacing: 5

                MyButton {
                    anchors.left: parent.left
                    anchors.right: parent.right
                    labelColour: "white"
                    labelText: "C"
                    font: myResult.font
                    onButtonClicked: {
                        myCalculatorViewModel.handelClear()
                    }
                }
                MyButton {
                    anchors.left: parent.left
                    anchors.right: parent.right
                    labelColour: "white"
                    labelText: "-"
                    font: myResult.font
                    onButtonClicked: {
                       myCalculatorViewModel.handleSubtraction()
                    }
                }
                MyButton {
                    anchors.left: parent.left
                    anchors.right: parent.right
                    labelColour: "white"
                    labelText: "+"
                    font: myResult.font
                    onButtonClicked: {
                        myCalculatorViewModel.handleAddition()
                    }
                }
                MyButton {
                    anchors.left: parent.left
                    anchors.right: parent.right
                    labelColour: "white"
                    labelText: "="
                    font: myResult.font
                    onButtonClicked: {
                        myCalculatorViewModel.handleEquals()
                    }
                }
            }
        }
    }
}
#include <QtGui/QGuiApplication>
#include <QQmlContext>
#include "qtquick2applicationviewer.h"
#include "MyCalculatorViewModel.h"

int main(int argc, char *argv[])
{
    QGuiApplication app(argc, argv);

    QtQuick2ApplicationViewer viewer;
    viewer.rootContext()->setContextProperty(
                     QStringLiteral("myCalculatorViewModel"),
                     new MyCalculatorViewModel());
    viewer.setMainQmlFile(QStringLiteral("qml/QtQuickSampleApp/main.qml"));
    viewer.showExpanded();

    return app.exec();
}
#ifndef MYCALCULATORVIEWMODEL_H
#define MYCALCULATORVIEWMODEL_H

#include <QObject>

class MyCalculatorViewModel : public QObject
{
    Q_OBJECT
    Q_PROPERTY( int userInput READ getUserInput WRITE setUserInput NOTIFY userInputChanged )
    Q_PROPERTY( int myResult READ getMyResult WRITE setMyResult NOTIFY myResultChanged )
    Q_PROPERTY( int operation READ getOperation )

public:
    MyCalculatorViewModel();

    enum MyCalculator_Operation
    {
        MyCalculator_Operation_None,
        MyCalculator_Operation_Subtration,
        MyCalculator_Operation_Addition
    };

    int getUserInput();
    void setUserInput( int userInput );
    int getMyResult();
    void setMyResult( int myResult );
    int getOperation();

    /**
     * This is the event handler for the Equals button on the view
     */
    Q_INVOKABLE void handleEquals();

    /**
     * This is the event handler for the Addition button on the view
     */
    Q_INVOKABLE void handleAddition();

    /**
     * This is the event handler for the Subtraction button on the view
     */
    Q_INVOKABLE void handleSubtraction();

    /**
     * This is the event handler for the Clear button on the view
     */
    Q_INVOKABLE void handelClear();

signals:

    void userInputChanged();
    void myResultChanged();

private:
    /**
     * A simple addition method
     */
    int add( int A, int B);

    /**
     * A simple subtraction method
     */
    int subtract( int A, int B);

    int m_userInput;
    int m_myResult;
    MyCalculator_Operation m_currentOperation;
};

#endif // MYCALCULATORVIEWMODEL_H
#include "MyCalculatorViewModel.h"

//////////////////////////////////////////////////////////////////////////////////////
MyCalculatorViewModel::MyCalculatorViewModel() :
    m_userInput( 0 ),
    m_myResult( 0 ),
    m_currentOperation( MyCalculator_Operation_None )
{
}

//////////////////////////////////////////////////////////////////////////////////////
int MyCalculatorViewModel::getUserInput()
{
    return m_userInput;
}

//////////////////////////////////////////////////////////////////////////////////////
void MyCalculatorViewModel::setUserInput( int userInput )
{
    m_userInput = userInput;
    emit userInputChanged();
}

//////////////////////////////////////////////////////////////////////////////////////
int MyCalculatorViewModel::getMyResult()
{
    return m_myResult;
}

//////////////////////////////////////////////////////////////////////////////////////
void MyCalculatorViewModel::setMyResult( int myResult )
{
    m_myResult = myResult;
    emit myResultChanged();
}

//////////////////////////////////////////////////////////////////////////////////////
int MyCalculatorViewModel::getOperation()
{
    return (int)m_currentOperation;
}

//////////////////////////////////////////////////////////////////////////////////////
int MyCalculatorViewModel::add( int A, int B)
{
    return A + B;
}

//////////////////////////////////////////////////////////////////////////////////////
int MyCalculatorViewModel::subtract( int A, int B)
{
    return A - B;
}

//////////////////////////////////////////////////////////////////////////////////////
void MyCalculatorViewModel::handleEquals()
{
    int result;

    if ( m_currentOperation == MyCalculator_Operation_Addition )
    {
        result = add( m_myResult, m_userInput );
    }
    else if ( m_currentOperation == MyCalculator_Operation_Subtration )
    {
        result = subtract( m_myResult, m_userInput );
    }
    else
    {
        result = m_userInput;
    }

    m_myResult = result;
    m_userInput = 0;
    m_currentOperation = MyCalculator_Operation_None;
    emit myResultChanged();
    emit userInputChanged();
}

//////////////////////////////////////////////////////////////////////////////////////
void MyCalculatorViewModel::handleAddition()
{
    int result;
    if ( m_currentOperation == MyCalculator_Operation_None )
    {
        result = m_userInput;
    }
    else
    {
        result = add( m_myResult, m_userInput );
    }

    m_myResult = result;
    m_userInput = 0;
    m_currentOperation = MyCalculator_Operation_Addition;
    emit myResultChanged();
    emit userInputChanged();
}

//////////////////////////////////////////////////////////////////////////////////////
void MyCalculatorViewModel::handleSubtraction()
{
    int result;
    if ( m_currentOperation == MyCalculator_Operation_None )
    {
        result = m_userInput;
    }
    else
    {
        result = subtract( m_myResult, m_userInput );
    }

    m_myResult = result;
    m_userInput = 0;
    m_currentOperation = MyCalculator_Operation_Subtration;
    emit myResultChanged();
    emit userInputChanged();
}

//////////////////////////////////////////////////////////////////////////////////////
void MyCalculatorViewModel::handelClear()
{
    m_myResult = 0;
    m_userInput = 0;
    m_currentOperation = MyCalculator_Operation_None;
    emit myResultChanged();
    emit userInputChanged();
}
And there you go you’ve written your very first QtQuick application that uses both QML and C++ good for you. Those in the know might have noticed that we’ve still not used Qt’s Model/View architecture in any great degree; Our ViewModel is just a simple QObject. Don’t fret the story will continue in my next installment QtQuick 103: Introduction to Qt’s Model/View Architecture, please stand by.
Thank you I hope you have enjoyed and found this tutorial helpful. Feel free to leave any comments or questions you might have below and I’ll try to answer them as time permits.
Until next time think imaginatively and design creatively
Brad thanks so much for these very detailed tutorials. I am starting out learning QML / Qt and this has been so helpful, better than the Qt site itself!. Thanks again, please keep up the good work – Craig