What the Heck is Mocha?
By: Brad
Hey Brad I’m starting to write tests for a Node application and I hear I’m suppose to use mocha, what the heck is that exactly?
mocha is a testing framework for JavaScript/Node. It includes a command line tool for invoking tests and APIs for defining and setting up tests.
Running Mocha Tests
To run tests with mocha you can use the command line tool > mocha.
This tool by defaults looks for tests defined under a sub folder called test but you can pass in a custom path to a directory or file > mocha tests or > mocha test/mytest.js. The command line has a number of arguments which you can find documented here.
In Node projects a NPM command is typically setup to call mocha with any and all arguments so you simply need to run npm test to invoke the mocha tests.
How Mocha tests work
A mocha test is just plain old JavaScript, you simply need to register the test with mocha so it gets picked up and run by the command line tool.
To define a mocha test you simply need to use the it() function which comes with the mocha NPM module.
The it() function takes two parameters: a descriptive name which will be displayed in the terminal and a function to invoke.
function doTest() {...}
it('my test', doTest);
The doTest function is responsible for invoking the code your testing and asserting that the code behaved as expected.
it('should add two numbers', () => {
  const result = 5 + 5;
  chai.expect(result).to.equal(10);
});
Notice I wrote my description as a sentence which starts with it, isn’t that very descriptive: it should add two numbers
Above I’ve defined a test, I provided the test function as an inline arrow function for simplicity. In the test I call the code I’m testing, the addition operator, then used the chai.expect library to ensure that the addition operator added the two numbers together as expected.
If the test is successful mocha will report a good test, if the addition operator has a bug then mocha will report a failing test.
But how does mocha know if the test passed or failed?
I see you are paying attention, if the assertion library isn’t part of mocha how does mocha know if the assertion failed?
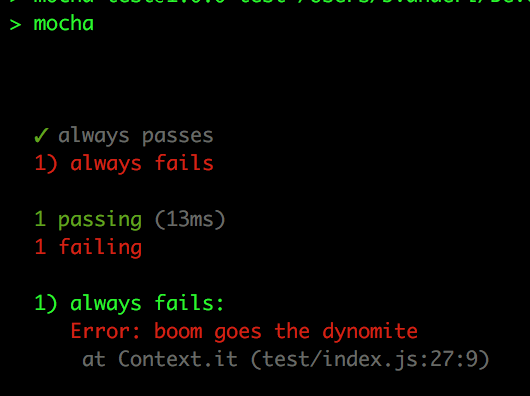
Although you can just trust the magic that is mocha it can be handy to understand what mocha is actually doing when it runs the test. The arrow function I passed into the it() function is getting invoked by mocha when I run the test but it is getting wrapped in a try-catch under the hood. When invoked if no exception is thrown then the test passed, otherwise mocha catches the exception and marks the test failed.
it('always passes', () => {
  // No assertions means no exceptions
  // means always passes
});

// Here an exception is thrown so mocha is catching it and
// marking the test failed. It will output the error text
// in the terminal
it('always fails', () => {
  throw new Error('boom goes the dynamite');
});
Exception? What you talking about? I’m not throwing an Exception!
The chai.expect() function I’m using here to assert the code’s behaviour will validate that the result equals what I expect it to (10) and if it does not match my expectation it will throw an exception.
The above test could be rewritten without chai.expect as so:
it('should add two numbers', () => {
  const result = 5 + 5;

  if (result !== 10) {
    throw new Error(`expect 10 got ${result}`);
  }
});
As you can tell having an assertion library is pretty handy to keep the test LOC count down.
Organizing Tests
Now that you know how to write a test lets talk about how to keep your tests organized.
You can just write a flat file with nothing but it() functions where each it() function defines another test case but mocha has another API used to define a Test Suite.
A TestSuite is a collection of tests related to testing different cases of a given component.
Lets say I have a bunch of tests for testing the addition operator and now I want to add tests for the subtraction operator. I could just keep writing it() functions but that might make it hard to sift through the tests when I run them or when I’m adding or modifying tests.
Luckily mocha lets you define TestSuites via the describe() function.
Just like the it() function describe() takes two parameters: a description of the suite and a function to call.
describe('Addition', () => {
   it('should add two numbers', () => {
    const result = 5 + 5;
    chai.expect(result).to.equal(10);
  });
});

describe('Subtraction', () => {
   it('should subtract two numbers', () => {
    const result = 5 - 5;
    chai.expect(result).to.equal(0);
  });
});
For the most part the describe() function will be used to organize tests. I can, if my editor supports it, minimize all the addition tests and only look at the subtraction tests I can even tell mocha to only run the subtraction tests by adding .only to the describe() function.
describe('Addition', () => {
   it('should add two numbers', () => {
    const result = 5 + 5;
    chai.expect(result).to.equal(10);
  });
});

// will only run the Subtraction tests
describe.only('Subtraction', () => {
   it('should subtract two numbers', () => {
    const result = 5 - 5;
    chai.expect(result).to.equal(0);
  });
});
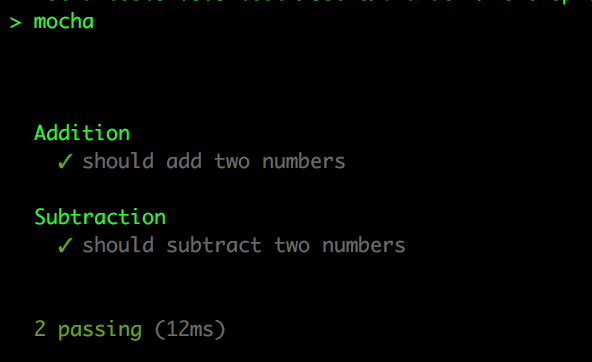
The terminal output will also organize the test by adding the test suite description to each test. Depending on the reporter used they might even be indented.
The secondary benefit that describe() blocks have is that the can set scope to your tests.
describe('Addition', () => {
  const expect = 10;
   it('should add two numbers', () => {
    const result = 5 + 5;
    chai.expect(result).to.equal(expect);
  });
});

describe('Subtraction', () => {
   it('should subtract two numbers', () => {
    const result = 5 - 5;
    chai.expect(result).to.equal(0);
  });
});
Here within my Addition describe() I defined a variable to be used in my it() tests. Thanks to the addition of block level scope in JavaScript with const/let this variable is only accessible to my Addition tests.
A better example as to why scoped variables within describe() blocks can be handy would be if you were testing a function which return a user object. The user object might contain multiple properties; instead of defining it over and over again you can define one globally for all get user tests.
const { expect } = chai;
describe('Get User', () => {
   const user = {
      id: 12345,
      name: 'Roger',
      email: 'roger.wilco@sierra.com',
   };

   it('should return the user', () => {
    expect(getUser(12345)).to.deep.equals(user);
   });

   it('should return all users', () => {
    expect(getUsers()).to.deep.equals([user]);
   });
});
Setting up and Tearing down Tests
One other feature mocha has it the ability to run code before and after invoking tests.
Setting Up
For example lets say we needed to seed a database with data prior to running tests. We can do that via the before() function. Like describe() and it() the before() function takes two parameters: a description, used if the before function failed, and a function to invoke.
const { expect } = chai;
describe('Get User', () => {
   const user = {
      id: 12345,
      name: 'Roger',
      email: 'roger.wilco@sierra.com',
   };

   before('seed database', () => {
     db.write(user);
   });

   it('should return the user', () => {
    expect(getUser(12345)).to.deep.equals(user);
   });

   it('should return all users', () => {
    expect(getUsers()).to.deep.equals([user]);
   });
});
Here the before() function will be run just before invoking the two it() tests. The before() function will only be run once. If we need it to run before each it() test, so twice here, we could use the beforeEach() function instead. beforeEach() and before() work exactly the same way say for the frequency of there invocation.
Like the const variables before()/beforeEach() functions are scoped to the describe block:
const { expect } = chai;
describe('Get User', () => {
   ...
   before('seed database', () => {
     db.write(user);
   });
   ...
});

describe('Delete User', () => {
   ...
   before('seed database', () => {
     db.write(user);
   });
   ...
});
Here mocha will first run the Get User suite where it will invoke its before() function prior to running the tests. Next mocha will run the Delete User suite where it will run its before() function prior to running that suites tests.
A suite can also have multiple before() blocks defined:
const { expect } = chai;
describe('Get User', () => {
   ...
   before('connect database', () => {
     db.connect(connectionString);
   });

   before('seed database', () => {
     db.write(user);
   });
   ...
});
The order before() functions are called is the same as the order they appear in the describe() function. Here we would first connect to the database followed by seeding it. Reasons to define your setup steps in multiple before() functions could be for code clarity or for easier trouble shooting because the before() description will be displayed in the terminal if a before() function failed. If we had a single before() function the terminal might read before hook failed: connect and seed database where as by having two before() functions as we do here the terminal might read before hook failed: seed database allowing us to know we connected but failed to seed.
It does not matter where you put the before() functions within your suite but I’d recommend putting them first:
const { expect } = chai;
describe('Get User', () => {
   it('my test', () => {...});
   ...
   before('seed database', () => { // still runs before the it()
     db.write(user);
   });
   ...
});
Tearing Down
As eluded to earlier mocha will let you run code after a test run via the after() function. Similar to the before() function the after() function takes two parameters: A description and a function to call.
The after() function is run after all the tests of a given suite have been run. You can use the after() function to tear down your test setup.
const { expect } = chai;
describe('Get User', () => {
   ...
   before('connect database', () => {
     db.connect(connectionString);
   });

   before('seed database', () => {
     db.write(user);
   });

   after('flush database', () => {
      db.destroy(user);
   });
   ...
});
You can have multiple after() functions like you can the before() functions where the order of execution is the order they appear in the scope. There is also an afterEach() version which runs after each it() function.
It does not matter where you put the after()/afterEach() function in your suite, they will always be run after the tests. I’d just recommend putting them after the before() functions and before the it() functions to keep them close to their before() counter parts but if you put them after the it() functions I guess that is ok too.
const { expect } = chai;
describe('Get User', () => {
   after('flush database', () => { // still run after the it()
      db.destroy(user);
   });
   ...
   before('seed database', () => {
     db.write(user);
   });

   after('flush database', () => { // still run after the it();
      db.destroy(user);
   });

   it('my tests', () => {...});

   after('flush database', () => { // still run after the it();
      db.destroy(user);
   });
   ...
});
There you have it, that is what mocha is; a testing framework used to write tests for JavaScript/Node applications. It is installed via an NPM module which includes APIs for defining tests (describe(), before()/beforeEach(), after()/afterEach(), it()) and a command line tool for running the tests.
Until next time think imaginatively and design creatively